Thursday 28 November 2019

Install Nutanix CE on an AMD Ryzen CPU

Install Nutanix CE on an AMD Ryzen CPU

What’s the issue?

Nutanix CE requires an Intel CPU according to Nutanix. (portal.nutanix.com) Although it’s not supported you can modify an installation to run on a modern AMD CPU. I’m using an AMD Ryzen 3700X system running VMware Workstation 15.

You can probably modify this config to run on bare metal just by changing the minimum_reqs.py to allow AMD.

System Used

  • AMD Ryzen 3700X
  • 32 GB 3200Mhz RAM
  • Windows 10 1909
  • VMware Workstation 15
  • Nutanix CE 2019.11.22 image

Thanks

  • The VMware part of this guide is made possible by the work of Tim Smith and his post here (tsmith.co)

Get Started

  • Download the “Disk Image-based Full Install” from here (next.nutanix.com)
  • Extract ce-2019.11.22-stable.img from ce-2019.11.22-stable.img.gz. I used 7-Zip.

Create the Nutanix CE virtual machine

  • Create a new folder for your vm, I called mine nutanix
  • Move ce-2019.11.22-stable.img into the folder
  • Rename ce-2019.11.22-stable.img to ce-flat.vmdk
  • Create a new file called ce.vmdk and insert the following:

The ce.vmdk disk descriptor file, more information here (kb.vmware.com)

# Disk DescriptorFile
version=1
encoding="UTF-8"
CID=4a23b86a
parentCID=ffffffff
createType="vmfs"
  
# Extent description
RW 14540800 VMFS "ce-flat.vmdk" 0
  
# The Disk Data Base
#DDB
  
ddb.adapterType = "lsilogic"
ddb.geometry.cylinders = "905"
ddb.geometry.heads = "255"
ddb.geometry.sectors = "63"
ddb.longContentID = "39ab32063800e361c1c248034a23b86a"
ddb.uuid = "60 00 C2 91 19 55 99 b4-0c 1e 38 af 74 3f 10 2d"
ddb.virtualHWVersion = "14"
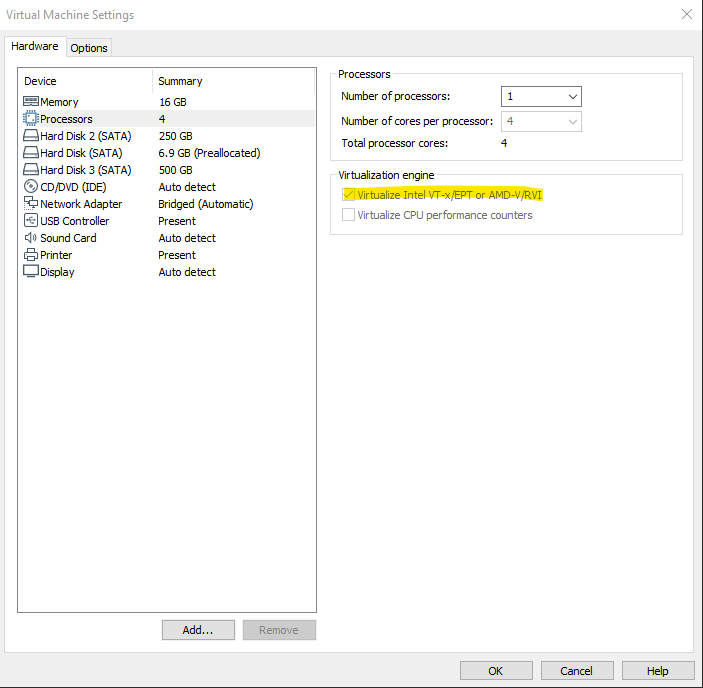
  • Open VMware Workstation and create a new virtual machine with the following specs:
    • 1 vCPU, 4 Cores
    • 16 GiB RAM
    • Virtualize Intel VT-x/EPT or AMD-V/RVI enabled (see fig 2.1)
    • Attach the ce.vmdk as the first hard disk, select SATA as the bus
    • Add a new 250 GiB disk on an SSD backed volume, select SATA as the bus
    • Add a new 500 GiB disk, select SATA as the bus

fig 2.1:

Enabling Virtualize Intel VT-x/EPT or AMD-V/RVI

  • Start her up

AMD Specifics

  • Once the system is booted, login with
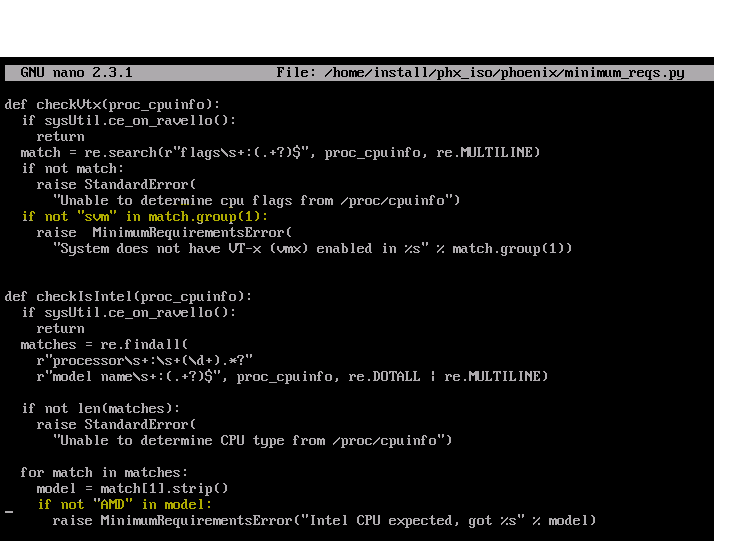
 root and nutanix/4u
  • Edit the minimum_reqs.py

code:

nano -c /home/install/phx_iso/phoenix/minimum_reqs.py
  • Find line 52, replace vmx with svm
  • Find line 70, replace Intel with AMD :)

fig 2.2:
Modifying the minimum requirements file

VMware Specifics

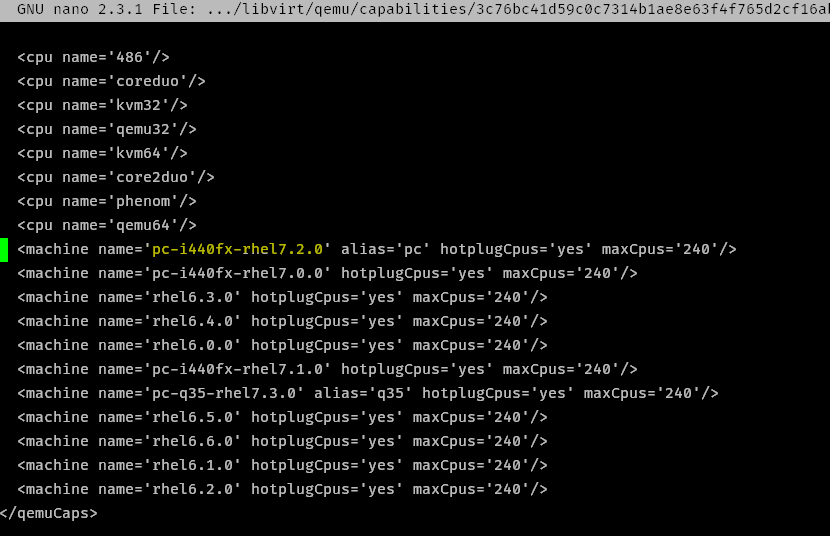
  • Modify the capabilities xml file:

code:

nano /var/cache/libvirt/qemu/capabilities/3c76bc41d59c0c7314b1ae8e63f4f765d2cf16abaeea081b3ca1f5d8732f7bb1.xml
  • Delete the line pc-i440fx-rhel7.2.0 near the very bottom (CTRL+K)
  • Edit the line containing pc-i440fx-rhel7.3.0 modify to pc-i440fx-rhel7.2.0

fig 2.3:

Modifying the capabilities xml file

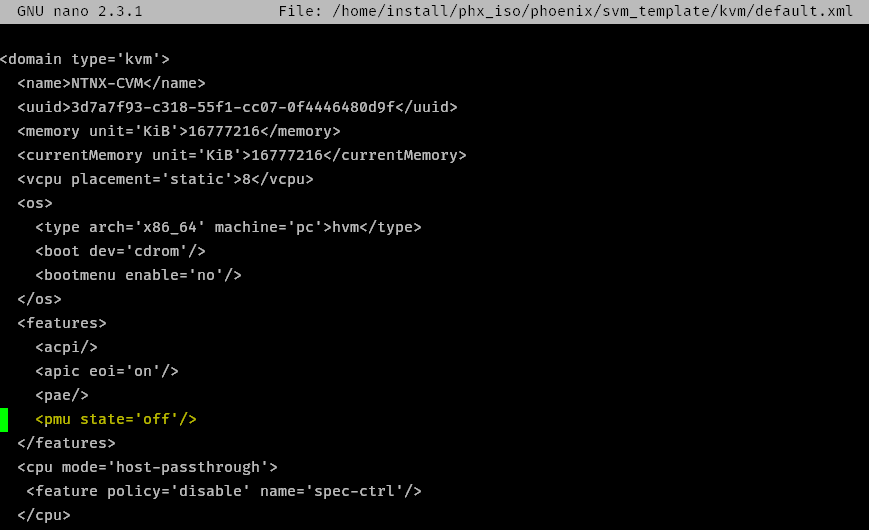
  • Modify the CVM default.xml

code:

nano /home/install/phx_iso/phoenix/svm_template/kvm/default.xml
  • Add <pmu state='off'/> to the <features> section

I believe this is disabling the “Performance Monitoring Unit” (linux-kvm.org) in libvirt

fig 2.4:

Modifying the default.xml file

Install Nutanix

  • type exit to go back to the login screen, login with install no password, then follow the instructions

All AMD Nutanix!

Troubleshooting

  • If the VM doesn’t boot and errors with dracut-initqueue timeout complaining it can’t find disk by UUID. Make sure your disks are all set to SATA on the bus
  • If the CVM won’t start after running install make sure you made the relevant VMware specific modifications.
  • If the installer won’t run complaining Intel VT-x is not running, make sure you have nested virt enabled on the vCPU - see fig 2.1. Also make sure you made the right changes to the minimum_reqs.py file.

Written with StackEdit.

Replace the MS Advanced Threat Analytics (ATA) Center Certificate

Replace the MS Advanced Threat Analytics (ATA) Center Certificate

Foreword

This guide is based on the Microsoft Document but goes into a little more detail and should be clearer, you should review the Microsoft guide as well as this one.
https://docs.microsoft.com/en-us/advanced-threat-analytics/modifying-ata-center-configuration
THIS MUST BE DONE BEFORE CERTIFICATE EXPIRES!!
I am purposely not using auto enrolment. This may generate a new thumbprint if the certificate auto renews, causing all the gateways to stop talking to the ATA Center server. This process must be done manually before the certificate expires each time!
This guide assumes you have a PKI infrastructure in your domain. The certificate you generate must be trusted by the gateway for this to work otherwise the gateways will disconnect from the ATA Center.
In this guide, I will:
  • Add a second server certificate
  • Update all the gateways so they recognise the new certificate
  • Switch to the new certificate
  • Update all the gateways again so they only use the new certificate.

Replacing the certificate

  • Check the existing certificate in the management panel. Currently all the gateways only have this certificate pinned in their configuration and will only talk to the Center if it’s using this certificate.
not secure
Center Configuration

Generating the New Certificate

  • Log into the ATA Center Server and open “Manage Computer Certificates”
  • Open Personal > Certificates
  • Right click in the right pane
  • Select All Tasks > Advanced Options > Create Custom Request.
Create Custom Certificate
  • Follow the enrolment wizard and select web server certificate template
Certificate Enroll
Web Server Template
  • On the Certificate Information screen, expand details and click properties
Web Certificate Information
  • Fill out the form, include all the relevant details including alternative names
Filling in Certificate Information
  • Deselect Microsoft DH Provider in the Private Key tab and change the Key size to 2048 bits
Filling in Certificate Information
  • Save the CSR somewhere handy
Save As
  • Copy the CSR to your issuing CA
  • Run the following certreq command to generate the certificate
    certreq -submit -config “SERVER1\ADCS Issuing CA-1” server1.csr server1.cer
  • Copy the resulting files back to the ATA Center server
Copy files in PowerShell

Importing the Certificate

  • Open the certificate, note the thumbprint, then install the certificate into the local computer, Personal store
Freshly Minted Certificate
Freshly Minted Certificate Thumbprint
Import Wizard Local Machine
Import Wizard Personal Store

Replacing the Certificate in ATA Center

  • Log into ATA Center web console
  • Configuration > Center
  • Select the new certificate, check the thumbprint matches the newly installed cert

IMPORTANT STEP, DON’T CLICK ACTIVATE YET

ATA Center Select Certificate
  • Click Save and wait for all gateways to sync the config – do not click activate
Gateways Syncing
Gateways Synced
  • Once you see the Green message that all gateways have synced the config click Activate and wait for all gateways to sync the config again.
Activate the Certificate
Gateways Syncing
Gateways Synced
  • You can now restart the ATA Center service in Windows
Restart ATA Center Service
When you reload the page in a fresh browser, the certificate should now be the new trusted cert.

Nutanix CE 2.0 on ESXi AOS Upgrade Hangs

AOS Upgrade on ESXi from 6.5.2 to 6.5.3.6 hangs. Issue I have tried to upgrade my Nutanix CE 2.0 based on ESXi to a newer AOS version for ...