Sunday, 4 October 2020

Verifying RDP connections with Kerberos and Certificates

Verifying RDP connections with Kerberos and Certificates.md

Removing Certificate warnings for RDP
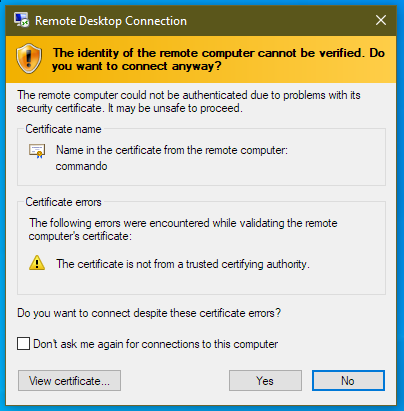
Certificate Warning

Certificate warnings on connection to an RDS server are not uncommon and are in fact normal when connecting to a non domain joined PC. They can be annoying, look unprofessional and can cause concern when users are required to connect.

Defaults & Self signed certificates

By default a non-domain joined PC will present a self-signed certificate when connecting. Since this isn’t trusted by the connecting client then a warning will be displayed.

When connected via RDP to a machine with a non trusted certificate, no security icon is shown in the connection bar.

no security icon on bar

While it’s possible to generate another self signed certificate with the DNS names you require, the certificate needs to be trusted by all client machines that connect otherwise the warning is displayed. Managing client’s trusted certificates is complex and not possible if you do not control the clients. In fact, it’s probably easier to just tick the ‘Don’t ask me again for connections to this computer’ box than it is to deploy a certificate to each client.

Ticking this box caches the certificate’s thumbprint in the REG_BINARY registry value, CertHash. The location in the registry is as follows:

HKEY_CURRENT_USER\SOFTWARE\Microsoft\Terminal Server Client\Servers\COMPUTERNAME
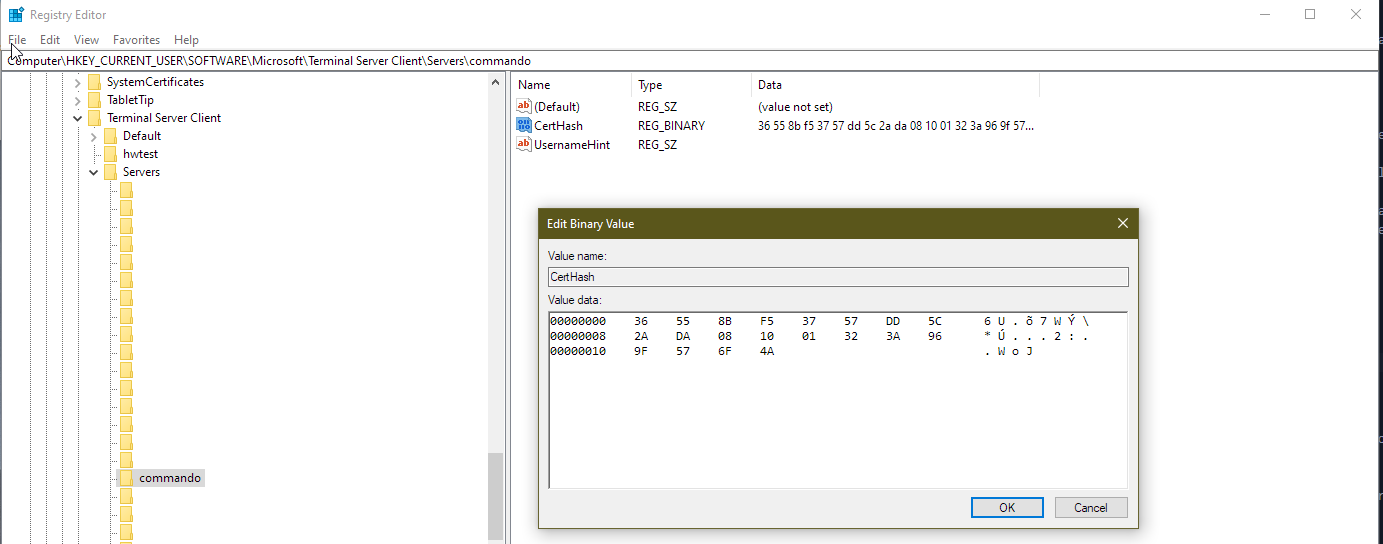
Registry Key Location

This is a per user setting so could be included in a login script for example. Here is some example PowerShell to set the value in the registry:

$thumbprint = "36558bf53757dd5c2ada081001323a969f576f4a"
$ComputerName = "commando"

$regPath = "HKCU:\SOFTWARE\Microsoft\Terminal Server Client\Servers\$($ComputerName)"
$thumbprintBinary = [byte[]] -split ($thumbprint -replace '..', '0x$& ')
New-ItemProperty -Path $regPath -Name CertHash -PropertyType Binary -Value $thumbprintBinary

Unfortunately, both methods of using self-signed certificates are cumbersome to manage.

Kerberos & Service Principal Names (SPNs)

By default you won’t get a certificate warning from a domain joined machine if connecting to it using it’s host name or fully qualified domain name (FQDN) since it will have an SPN registered for TERMSVC/hostname and TERMSVC/fqdn.

If you have a domain joined machine that you want to RDP to using an alternative name, you can use an SPN to allow Kerberos authentication to work. This only works for a single RDP endpoint since SPNs must be unique in the forest.

To create a new SPN, use the setspn utility

Show current SPNs

setspn -l computername

setspn list

Set a new SPN

setspn -s TERMSRV/aliasname computername
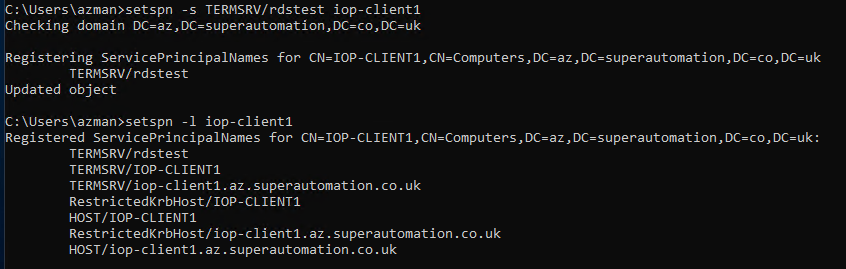
setspn set

Once a new SPN is added, connecting to the machine with the aliasname will show the connection is verified with Kerberos.
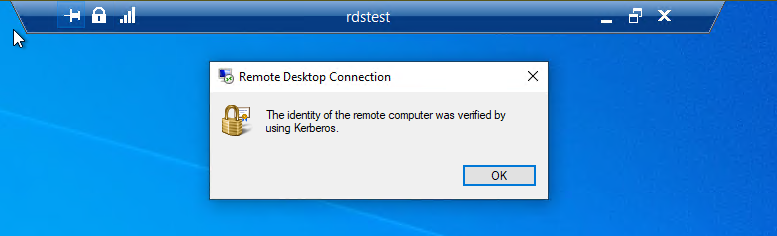
kerberos verified

Public Certificate Authority (CA) Signed certificate

It’s possible to use a wildcard, public CA signed certificate to secure an RDP connection. If you have a CA cert that provides the DNS name you need for connection then it’s possible to use this on all of the RDS servers behind a simple load balancer. To do this you must import the certificate in Windows. In my example I’m using a let’s encrypt wildcard certificate, the only requirement I can see is that it must have a greater than 2048 bit private key and include the “Server Authentication” Enhanced Key Usage.

Create a pfx bundle of your certificate on a machine with openssl installed. The following command includes the CA chain in the pfx.

openssl pkcs12 -export -out certificate.pfx -inkey privkey.pem -in cert.pem -certfile chain.pem

Once you have a pfx file you can import it in Windows. I imported to the default location, which is the local computer’s “personal” store. Right click on the pfx file and click import.
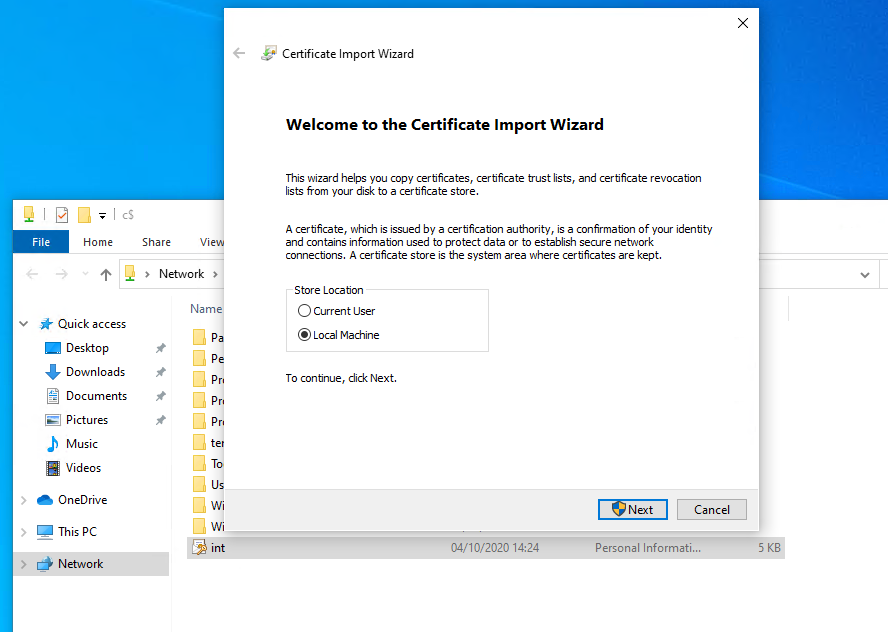
Import into Windows

Note that there is a private key available for the imported certificate
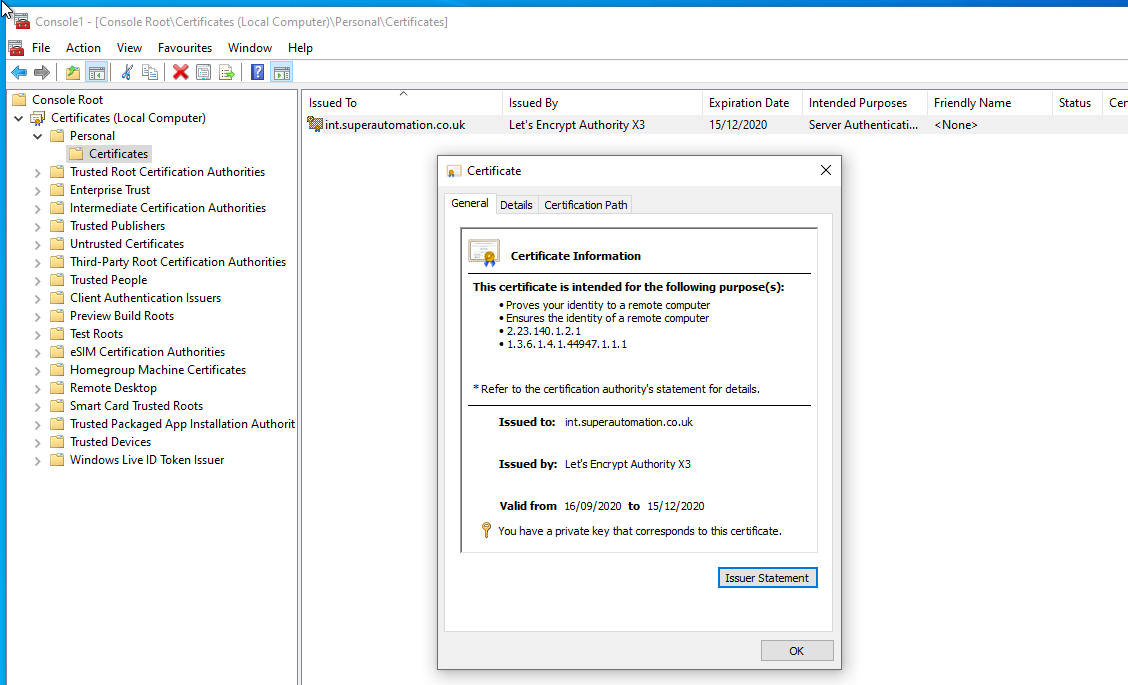
Imported certificate

Once imported, set the RDS certificate using PowerShell and WMI. WARNING: It’s worth mentioning that restarting the TermService service will kill current RDP connections so make sure to do this from the console of the machine. If the TermService service doesn’t find a valid certificate you could be locked out if you only have RDP access to the machine.

$GenSettingsPath = Get-WmiObject -Namespace "root\cimv2\TerminalServices" -Class "Win32_TSGeneralSetting"
Set-WmiInstance -Path $GenSettingsPath -Arguments @{SSLCertificateSHA1Hash="THUMBPRINT"}

Restart-Service TermService -Force
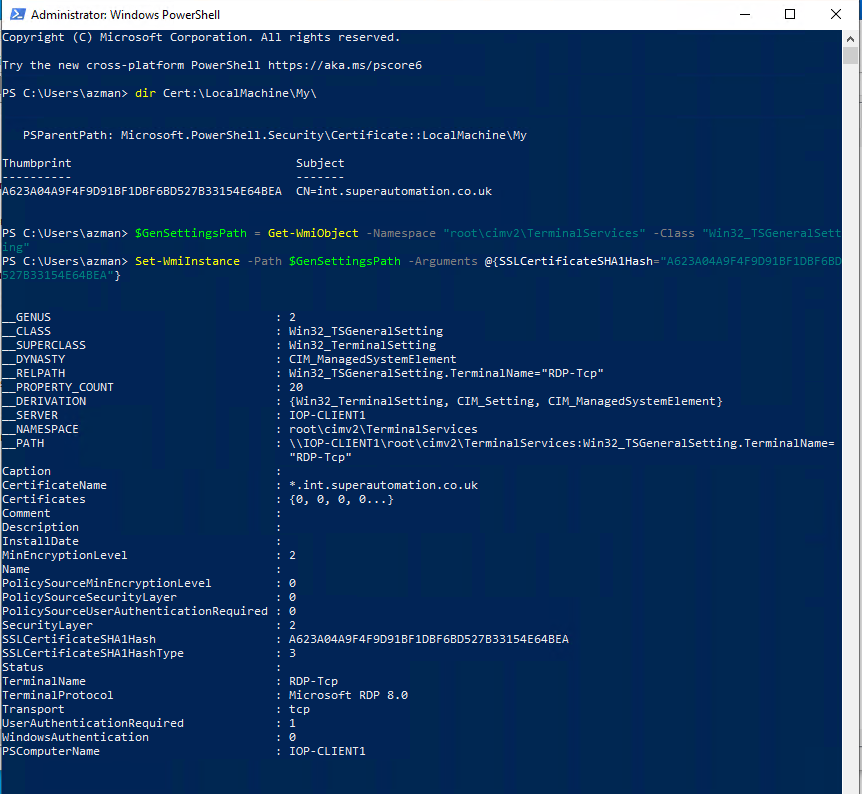
PowerShell output

Once connected, the connection is shown to be verified by a server certificate
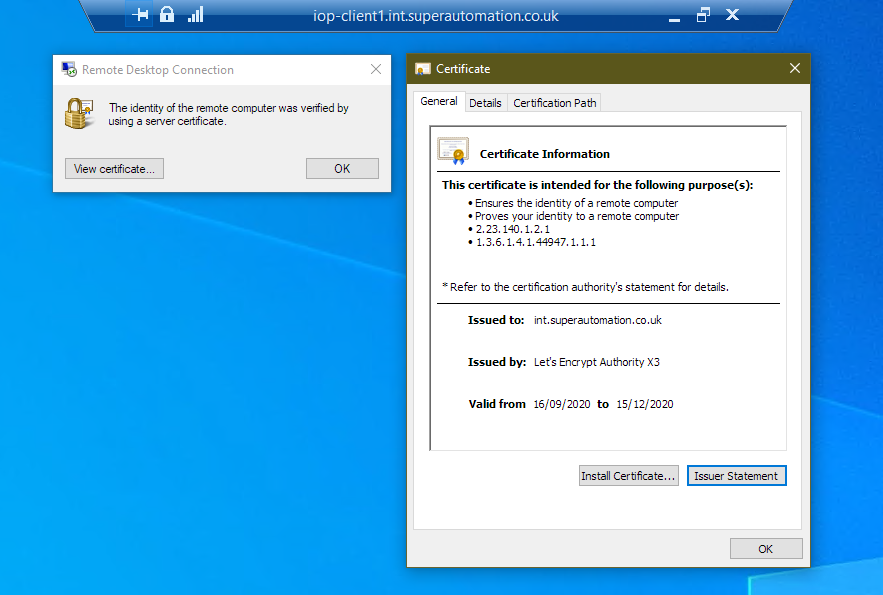
certificate Verified image

Certificate from an Enterprise Active Directory (AD) CA

You can also secure an RDP connection to a single or group of machines using a digital certificate from your Enterprise, AD Certificate Authority. This is beneficial if you have a group of RDS servers behind a simple load balancer.

SECURITY WARNING: To generate a certificate from the Enterprise CA, we need to create a certificate template and publish in AD. Since we need arbitrary subject alternative names enabled in the template this is a dangerous template to create and leave enabled. For this example, I will create the template, publish it, request a certificate and then disable the template so it cannot be used automatically. This template could allow any domain computer to create a certificate for any name and therefore compromise the entire security of the CA. It would be best to secure the template so it requires CA manager approval before the certificate is issued. The following code snippets would need to be modified to handle a pending request.

Template creation steps

  1. On your enterprise CA, open the Certification Authority application
  2. Right click on Certificate Templates and click Manage
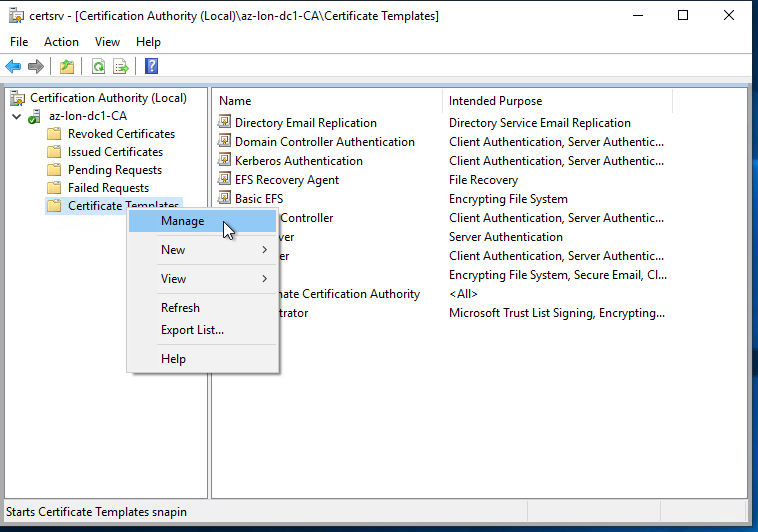
Click Manage

  1. The Certificate Templates Console opens, right click Computer and click Duplicate Template
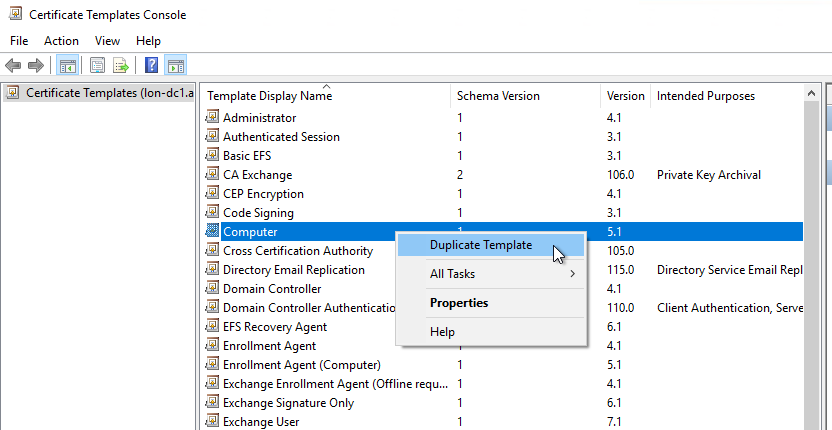
Click Duplicate Template

  1. On the General tab, give the template an appropriate name, in this example I am using “RemoteDesktopComputer”
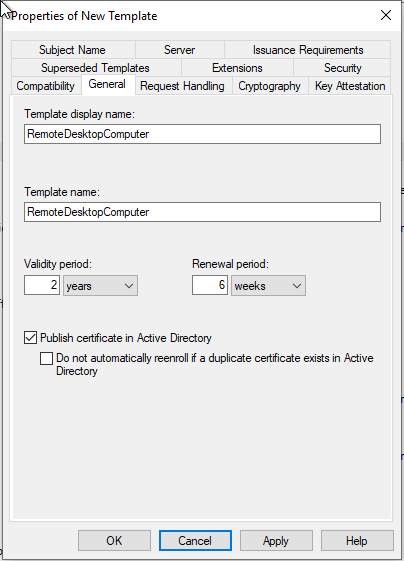
Name the template RemoteDesktopComputer

  1. Check the minimum key size is 2048-bits on the Cryptography tab
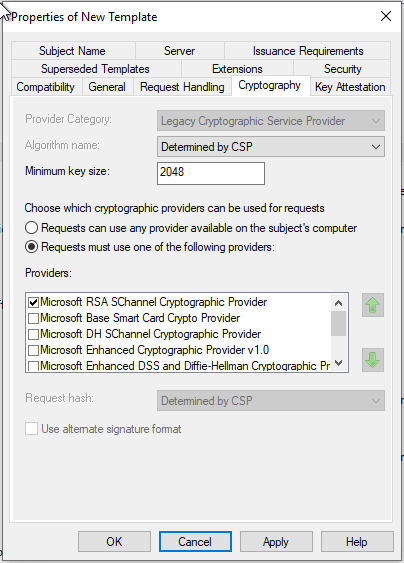
Crypto Tab

  1. Check that Server Authentication is enabled in the Application Polices section of the Extensions tab
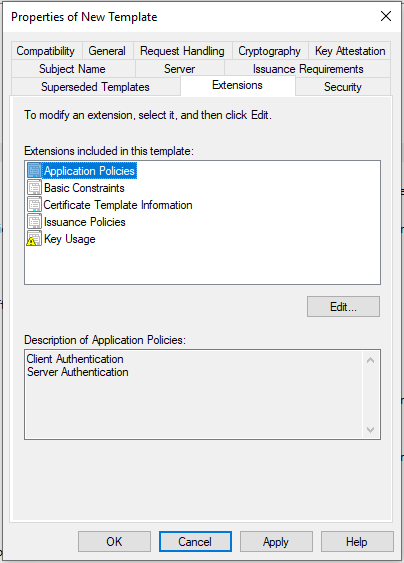
Extensions Tab

  1. On the Subject Name tab, choose supply in the request. Note the security warning In a production environment, the “CA Certificate manager approval” option should be selected to ensure that certificates from this template are validated before issuance.
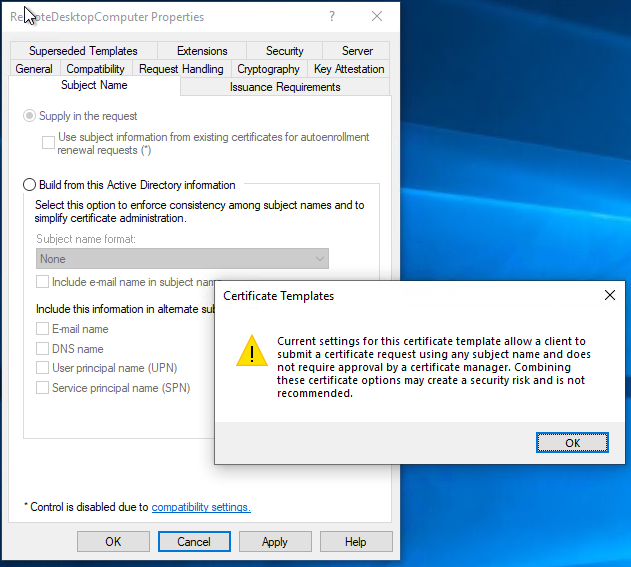
Subject Name Tab

  1. Review the Issuance Requirements tab, for this example the “CA Certificate manager approval” is unchecked, Do not do this in a production environment
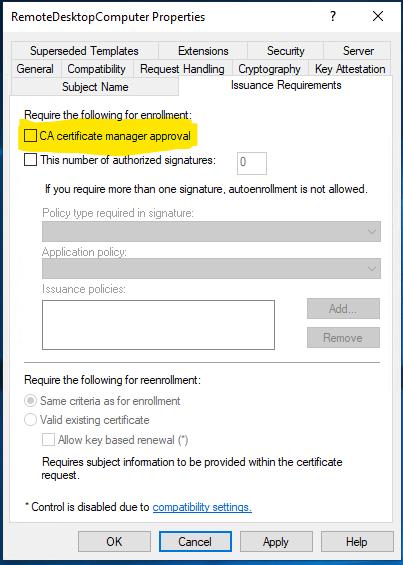
Issuance Requirements Tab

  1. Click OK to save the template, close the Certificate Templates Console window
  2. In the Certification Authority window, Right click on Certificate Templates and click “Certificate Template to issue”
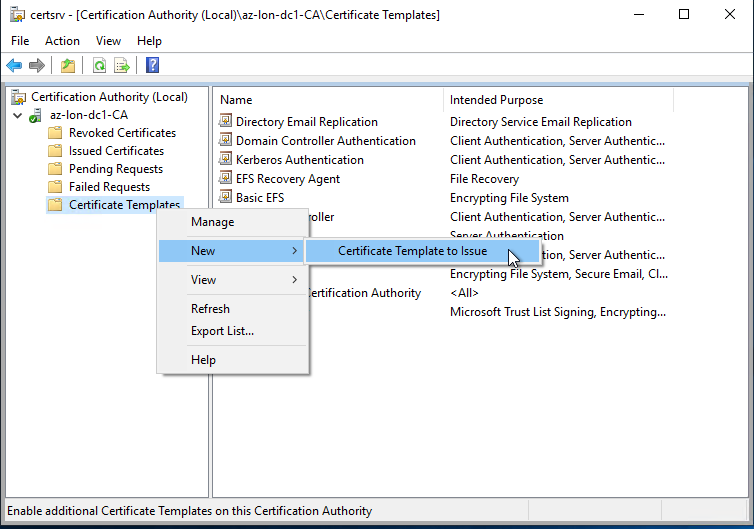
Click Certificate Template to issue

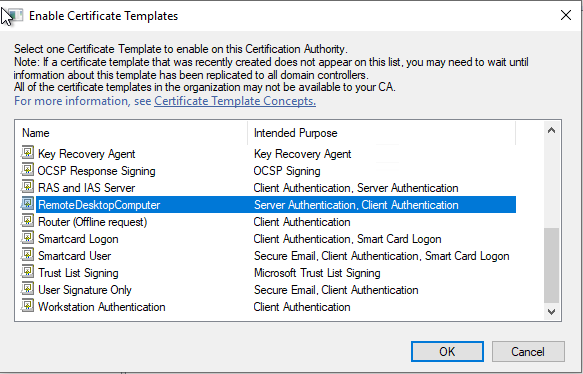
  1. Select the new template

Select the new template

Once you have a template created and published, the following PowerShell will request and issue a new certificate on the RDP server.

$CN = "CN=COMPUTER"
$dnsNames = @("COMPUTER", "computer.example.com", "loadbalancer.example.com")

$Cert = Get-Certificate -Template "RemoteDesktopComputer" `
	-SubjectName $CN -DnsName $dnsNames `
	-CertStoreLocation "cert:\LocalMachine\My" -Url ldap:

$Cert

At this point, check that the certificate in the computer certificates mmc is as expected and contains the correct DNS subject alternative names.
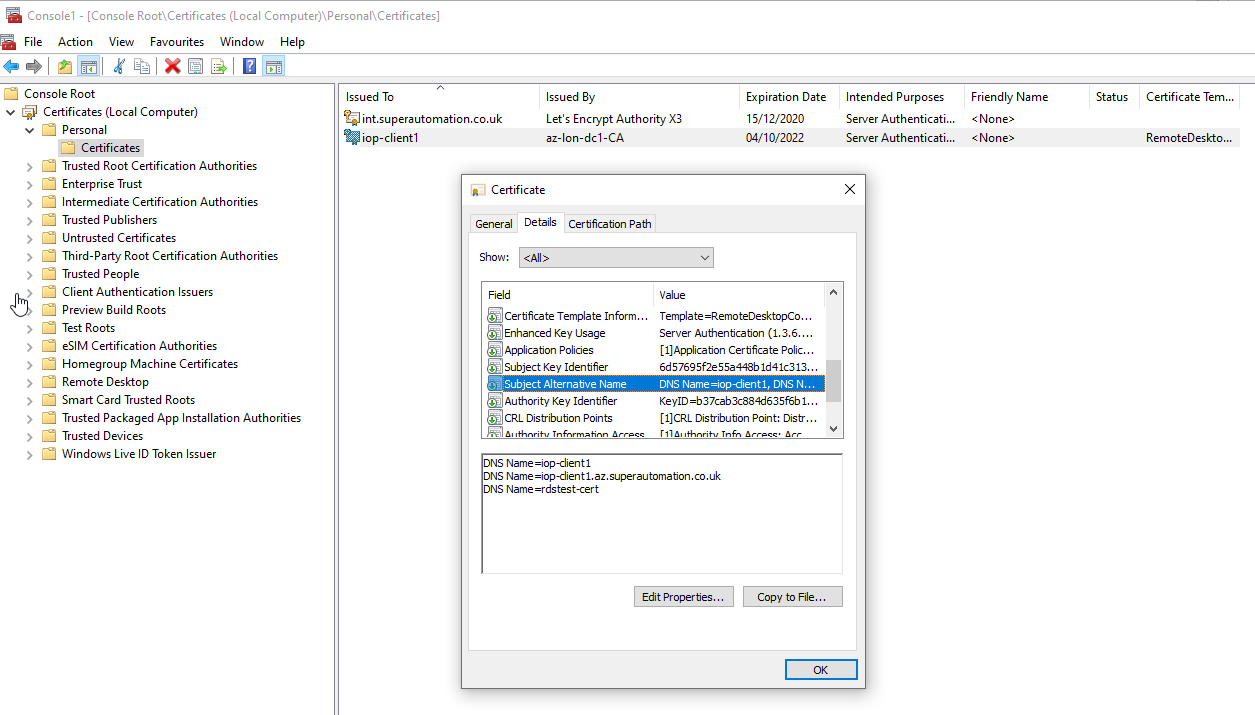
Issued Certificate

Once done, run the following in the same PowerShell session to apply the certificate. WARNING: It’s worth mentioning that restarting the TermService service will kill current RDP connections so make sure to do this from the console of the machine in case the certificate is invalid. If the TermService service doesn’t find a valid certificate you could be locked out if you only have RDP access to the machine.

if ($cert) {
	$GenSettingsPath = Get-WmiObject -Namespace "root\cimv2\TerminalServices" -Class "Win32_TSGeneralSetting"
	Set-WmiInstance -Path $GenSettingsPath -Arguments @{SSLCertificateSHA1Hash="$($Cert.Certificate.Thumbprint)"}

	Restart-Service TermService -Force
} else {
	Write-Host "Error generating certificate"
}

Once connected, the connection is shown to be verified by a server certificate
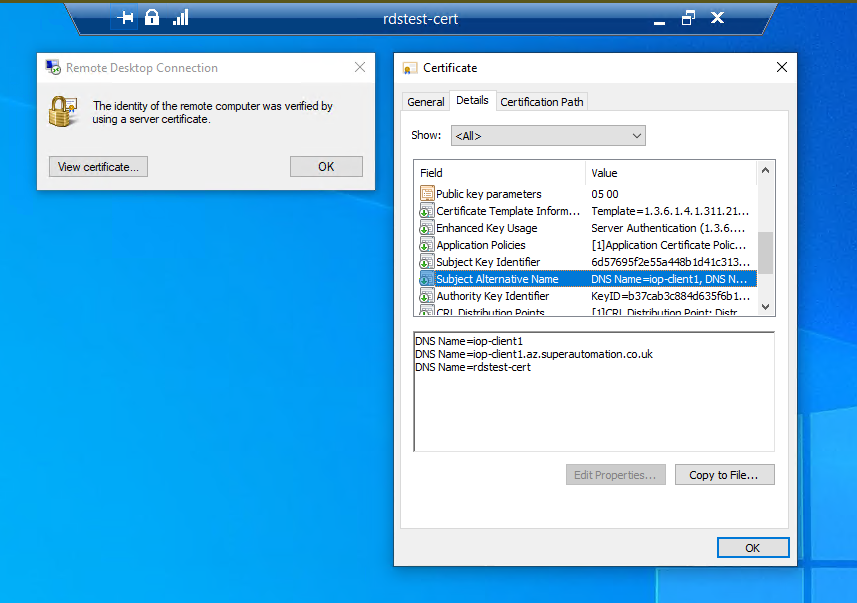
certificate Verified

IMPORTANT At this point, delete the published certificate template or secure it in another way
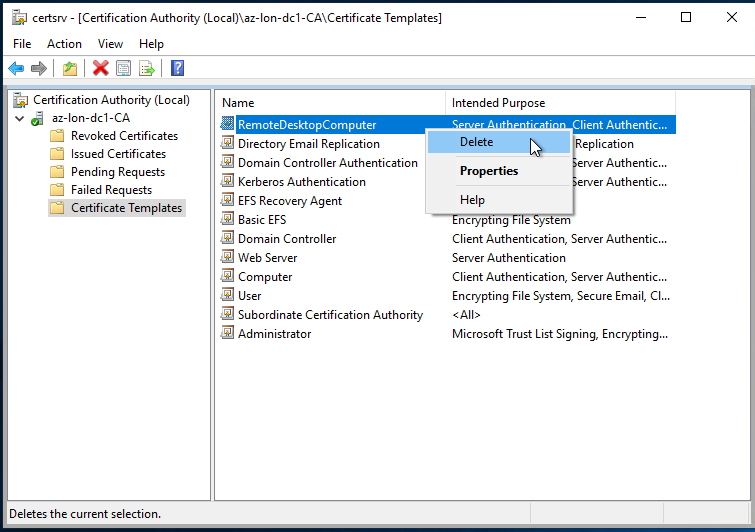
Delete the template

Written with StackEdit.
Saturday, 26 September 2020

Adding VLANs to OpenWRT

Adding VLANs to OpenWRT.md

Adding VLANs to a hacked OpenWRT router

Technicolor MediaAccess TG589vac

TG589vac Router

Warning: Incorrectly modifying the /etc/config/network file can cause switch/router inoperabilty, it could brick the device or cause it to lose network connectivity to it’s management interface. Follow these steps only with full knowledge that you could destroy your router or switch. I accept no responsibility!

I inherited one of these routers from a previous ISP and bought another from ebay since they make pretty competent 4-port gigabit switches once the firmware has been rooted. I have a guide to root your TG589vac here. Since setting them up as my home lab switches, I now have a requirement to implement VLANs on my network for segmentation and to make things tidyer on my virtualisation hosts.

Since these routers are running OpenWRT then adding VLANs to them is fairly straight forward. Log into the router as root and modify the network config file with vi /etc/config/network

The interesting section of this file is here:

config switch_vlan 'lan_switch'
	option ports '1* 2* 3* 4* 8t'
	option device 'bcmsw'
	option vlan '1'
config switch_vlan 'lan_switch'
	option ports '1* 2* 4t 8t'
	option device 'bcmsw'
	option vlan '1'

config switch_vlan 'lan_switch_vlan5'
	option ports '3* 4t 8t'
	option device 'bcmsw'
	option vlan '5'

Notice that port 3 was removed and port 4 was switched to tagged on VLAN id 1, then VLAN id 5 has been configured on port 3 untagged and port 4 tagged. I’m unsure of the significace of port 8t but in my case it works with the port included in all additional VLANs.

* - denotes untagged
t - denotes tagged

Warning: DO NOT change the name of the vlan ‘lan_switch’ doing so caused a segfault when reloading the network on my switch and soft-bricked it. The switch was left restarting the network over and over. After much trial and error, I managed to factory reset it once all physical network ports were unplugged.

Once you have made your edits, restart the network with /etc/init.d/network reload or service network reload depending on the OpenWRT version.

root@dsldevice:~# /etc/init.d/network reload  
Success  
JUMBO_PORT_MASK:0x000001FF  
GPHY_0 port accepts jumbo frames.  
GPHY_1 port accepts jumbo frames.  
GMII_1 port accepts jumbo frames.  
GMII_2 port accepts jumbo frames.  
GPON_SERDES port accepts jumbo frames.  
MOCA port accepts jumbo frames.  
USB port accepts jumbo frames.  
GPON port accepts jumbo frames.  
MIPS port accepts jumbo frames.  
Success  
Success  
CDK_E_PORT  
CDK_E_PORT

If you happen to do this and find out you cannot get multicast working on your new VLANs, check out this post.

Written with StackEdit.

Saturday, 19 September 2020

Windows Process Command Line Logging

Windows Process Command Line Logging

Windows Process Command Line Logging

Introduction

There are many reasons to gather process launch information in a Windows environment. Troubleshooting, Security forensics, Performance Analysis to name a few. By default, Windows does not log process launch information so it will need to be configured using local or group policy.

There are some security consequences of enabling process command line logging. Some commands, including some legacy AD commands require using a password or secret key as a parameter. Ideally we wouldn’t want these secrets appearing in logs, unfortunately the the only way to exclude them is to disable command line logging which substantially reduces the usefulness of enabling process logging in the first place.

Reading the logs requires local administrator rights on the system, however this could lead to privilege escalation; for instance if a logged command line included a Domain Admin password. The usefulness in forensics though, may be more benefit than the risk of having secrets in the Windows Event log. It may be prudent to configure log forwarding to a hardened server and regular log rotation on client and server systems.

Required Policy Settings

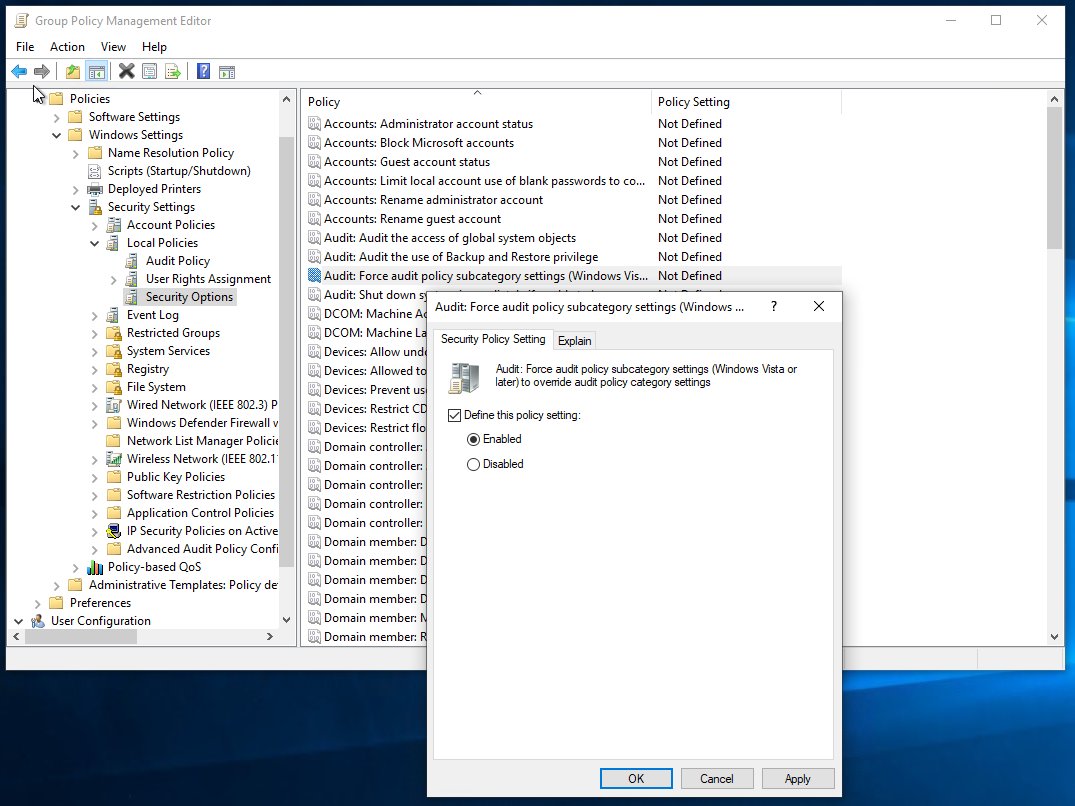
Warning: Enabling the Audit: Force audit policy subcategory settings policy will override any basic policy settings that are configured on the system. These should be translated to the equivalent advanced audit settings if they are required.

In order for Windows to log event ID 4688 so that you can see Windows process creation events and their command lines, there are several policy settings to configure:

Enable Audit: Force audit policy subcategory settings policy in Computer Configuration\Policies\Windows Settings\Local Policies\Security Options

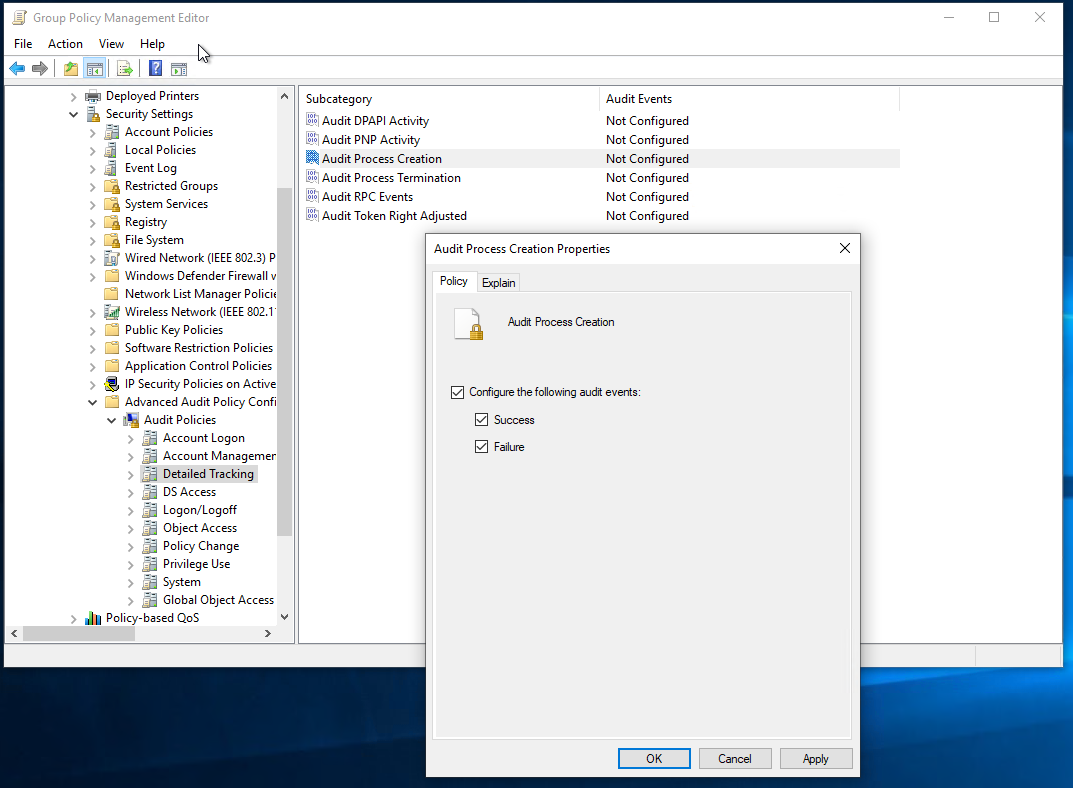
Enable the Audit Process Creation policy in Computer Configuration\Policies\Windows Settings\Security Settings\Advanced Audit Configuration\Audit Policies\Detailed Tracking

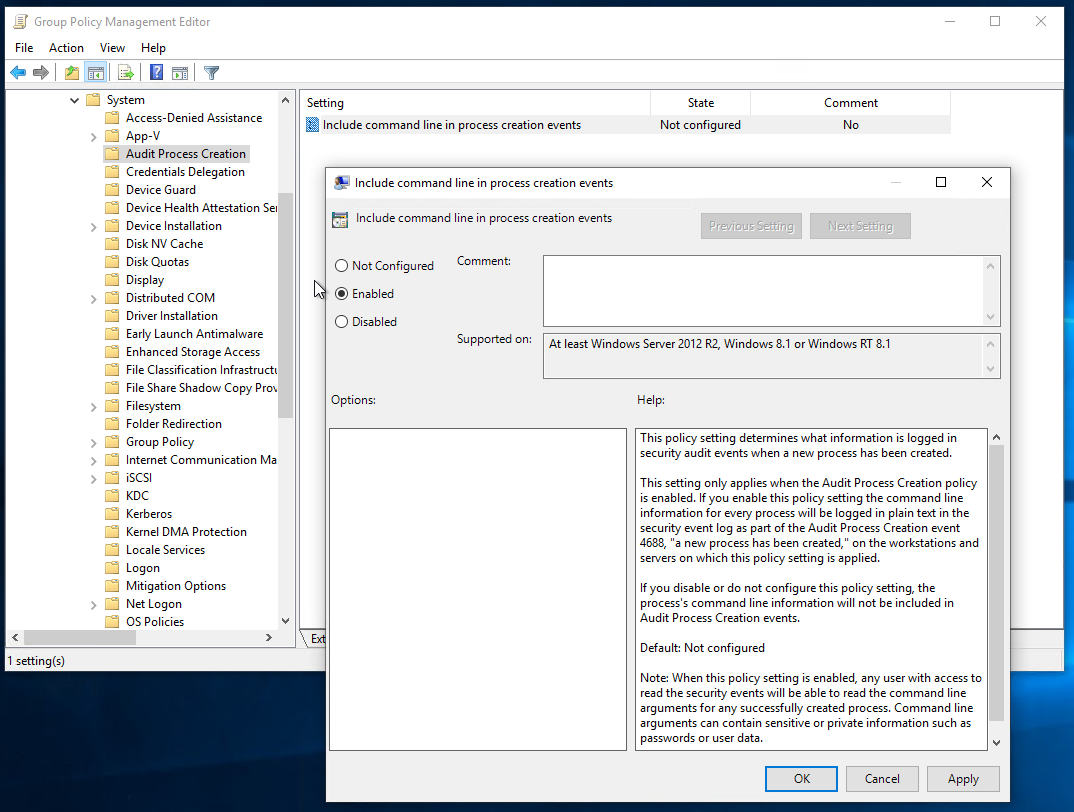
Enable the Include command line in process creation events setting in Administrative Templates\System\Audit Process Creation

Audit: Force audit policy subcategory settings
Force sub policy

Audit Process Creation

Include command line in process creation events
Include Command Line

If using Group Policy, once the policy is saved, run gpupdate /force on the targeted system. Once applied, running auditpol /get /category:* should show the appropriate audit policies being applied.

Troubleshooting

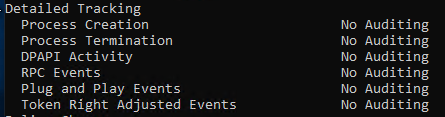
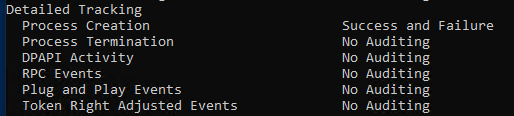
While deploying this group policy, I noticed that Process Creation was not being set when running auditpol /get /category:*. After enabling an unrelated advanced audit policy such as Account Lockout in the Logon/Logoff category, the Process Creation policy was applied. I was then able to remove Account Lockout while still keeping Process Creation. I’m not exactly sure why this issue ocurred, but I think it happened due to the order the policy elements were applied.

No Auditing Success and Failure

Reviewing the Windows Event Log

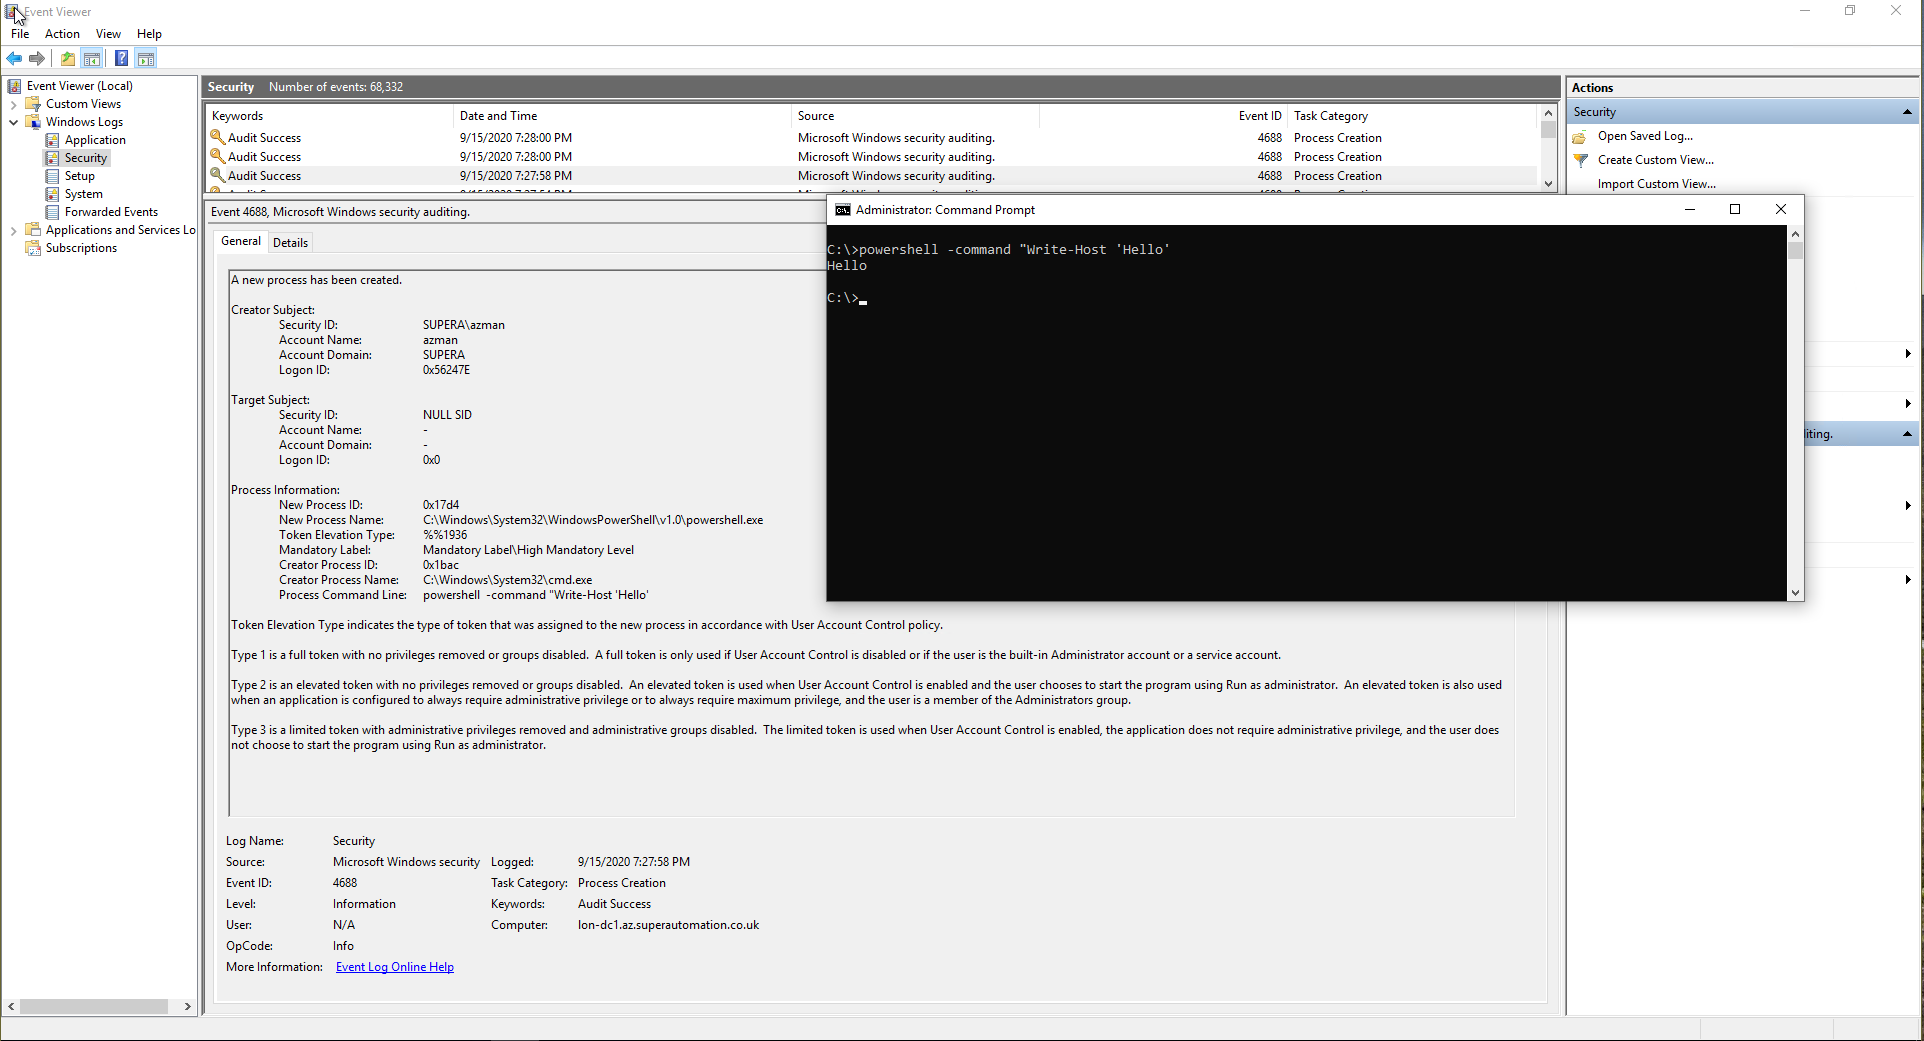
Once the above policy and audit settings are in place then the system will begin logging event ID 4866 in the System event log

Windows 4688

Gathering Process History for a machine in PowerShell

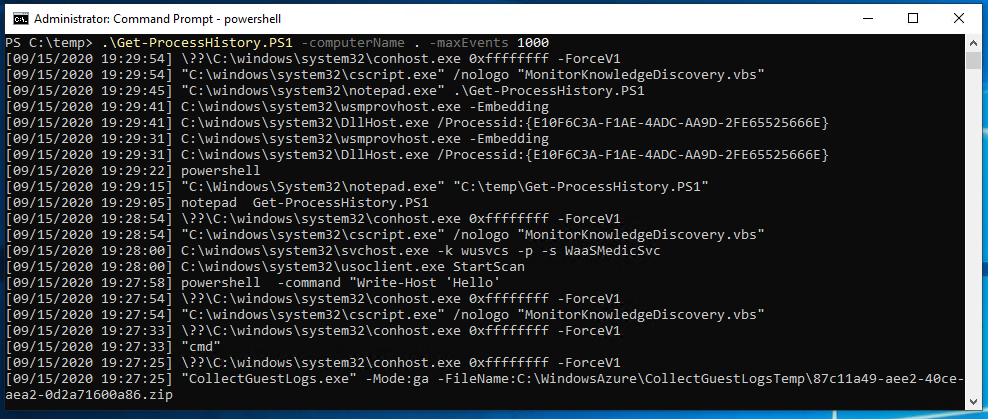
Looking at windows event logs can be time consuming and tedious, so here is a short PowerShell script to parse the event log on a target machine for recent commands:

Script Output:

Script Output

Extending with SysInternals Sysmon

While logging process creation events with the full command line is a powerful forensic tool, there is much more detailed logging available in SysInternals Sysmon. Next time I will be installing and configuring Sysmon to generate more verbose forensic logs including process creation and termination, generation of suspicious file modification and deletion logs, Registry modification and even WMI event logging.

Gathering Domain Controller Audit Policy

I’ve also written a quick script to gather the audit policy for all Domain Controllers in the domain. You can find it here.

Written with StackEdit.
Quick Script: DC Audit Policy

Quick Script: DC Audit Policy

Quick Script: Check all Domain Controllers for Audit Policy Settings

Introduction

Here’s a quick script to gather the detailed audit policy for all Domain Controllers in the domain. This is useful if you have domain controllers in different OUs with different policies applied. It will give a quick overview of each audit policy on each machine and since it’s in a GridView it’s easy to filter and sort the list so you can check a single policy against all your DCs.

The Script

Written with StackEdit.
Wednesday, 13 May 2020

Quick Script to Modify user home directory permissions

Quick Script to Modify user home directory permissions

Home Drive Permissions

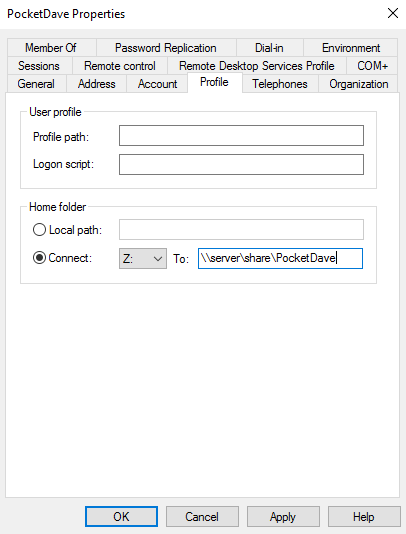
common user home folder location from dsa.msc

Migrating user home drives can be a pain if permissions are not copied over at the same time. Permissions can also get messed up for other reasons like improper data restore or an admin clicking the wrong button.

Provided your home folder share is configured as \\server\share\%username% then this quick script can add the user with Full Control rights to their folder.

$usersfolder = "\\server\share\"

foreach ($folder in (gci $usersfolder)) {
    Write-Host $folder.FullName -ForegroundColor Yellow
    $Acl = Get-Acl $folder.FullName
    $AccessRule = New-Object System.Security.AccessControl.FileSystemAccessRule("DOMAIN\$($folder.name)", "FullControl","ContainerInherit,ObjectInherit","None","Allow")
    $Acl.SetAccessRule($AccessRule)
    Set-Acl -Path $folder.FullName -AclObject $Acl
}

This will iterate through the folders and add DOMAIN\username (provided the folder is named the same as the user’s samaccountname) with Full Control.

Written with StackEdit.
Thursday, 28 November 2019

Install Nutanix CE on an AMD Ryzen CPU

Install Nutanix CE on an AMD Ryzen CPU

What’s the issue?

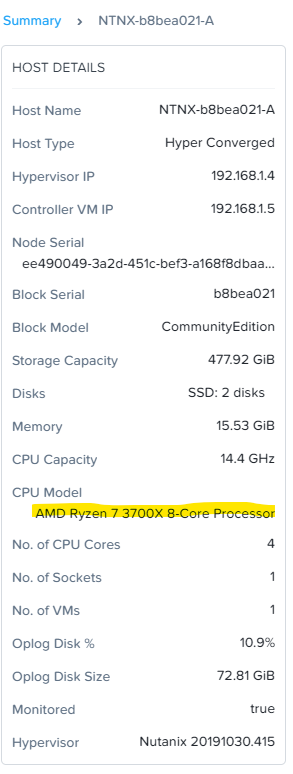
Nutanix CE requires an Intel CPU according to Nutanix. (portal.nutanix.com) Although it’s not supported you can modify an installation to run on a modern AMD CPU. I’m using an AMD Ryzen 3700X system running VMware Workstation 15.

You can probably modify this config to run on bare metal just by changing the minimum_reqs.py to allow AMD.

System Used

  • AMD Ryzen 3700X
  • 32 GB 3200Mhz RAM
  • Windows 10 1909
  • VMware Workstation 15
  • Nutanix CE 2019.11.22 image

Thanks

  • The VMware part of this guide is made possible by the work of Tim Smith and his post here (tsmith.co)

Get Started

  • Download the “Disk Image-based Full Install” from here (next.nutanix.com)
  • Extract ce-2019.11.22-stable.img from ce-2019.11.22-stable.img.gz. I used 7-Zip.

Create the Nutanix CE virtual machine

  • Create a new folder for your vm, I called mine nutanix
  • Move ce-2019.11.22-stable.img into the folder
  • Rename ce-2019.11.22-stable.img to ce-flat.vmdk
  • Create a new file called ce.vmdk and insert the following:

The ce.vmdk disk descriptor file, more information here (kb.vmware.com)

# Disk DescriptorFile
version=1
encoding="UTF-8"
CID=4a23b86a
parentCID=ffffffff
createType="vmfs"
  
# Extent description
RW 14540800 VMFS "ce-flat.vmdk" 0
  
# The Disk Data Base
#DDB
  
ddb.adapterType = "lsilogic"
ddb.geometry.cylinders = "905"
ddb.geometry.heads = "255"
ddb.geometry.sectors = "63"
ddb.longContentID = "39ab32063800e361c1c248034a23b86a"
ddb.uuid = "60 00 C2 91 19 55 99 b4-0c 1e 38 af 74 3f 10 2d"
ddb.virtualHWVersion = "14"
  • Open VMware Workstation and create a new virtual machine with the following specs:
    • 1 vCPU, 4 Cores
    • 16 GiB RAM
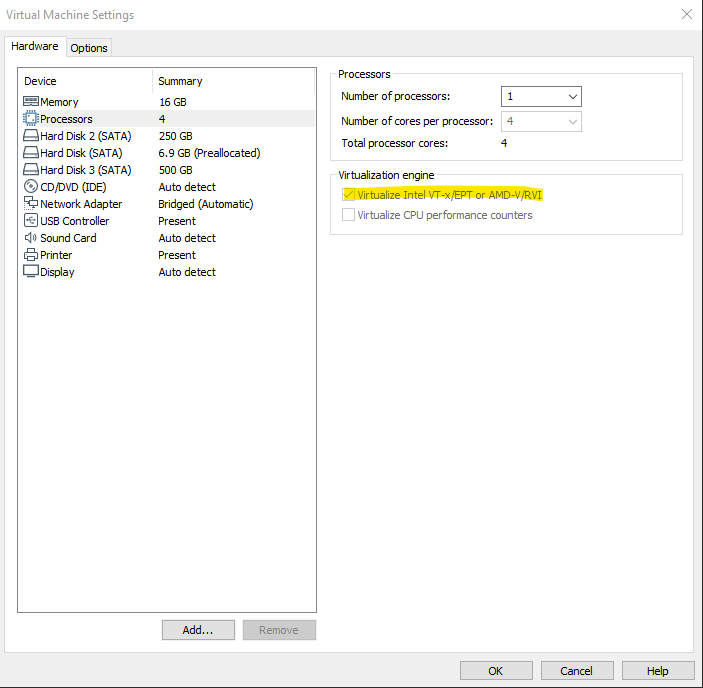
    • Virtualize Intel VT-x/EPT or AMD-V/RVI enabled (see fig 2.1)
    • Attach the ce.vmdk as the first hard disk, select SATA as the bus
    • Add a new 250 GiB disk on an SSD backed volume, select SATA as the bus
    • Add a new 500 GiB disk, select SATA as the bus

fig 2.1:

Enabling Virtualize Intel VT-x/EPT or AMD-V/RVI

  • Start her up

AMD Specifics

  • Once the system is booted, login with root and nutanix/4u
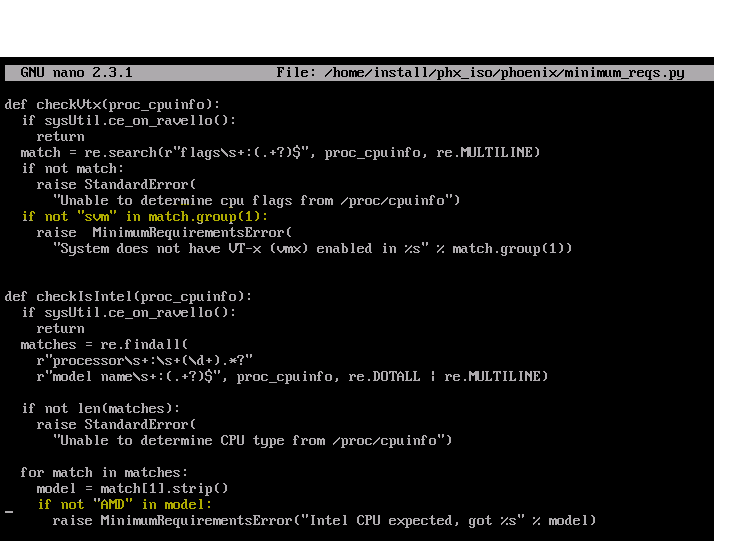
  • Edit the minimum_reqs.py

code:

nano -c /home/install/phx_iso/phoenix/minimum_reqs.py
  • Find line 52, replace vmx with svm
  • Find line 70, replace Intel with AMD :)

fig 2.2:
Modifying the minimum requirements file

VMware Specifics

  • Modify the capabilities xml file:

code:

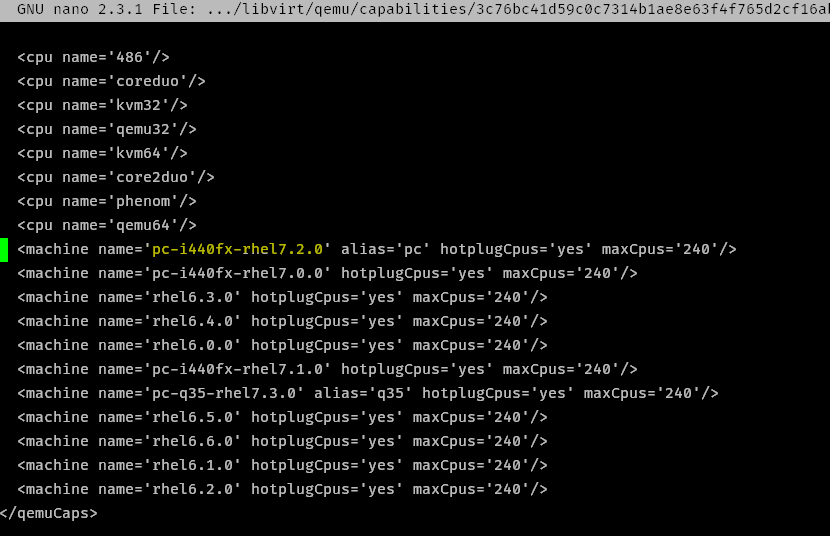
nano /var/cache/libvirt/qemu/capabilities/3c76bc41d59c0c7314b1ae8e63f4f765d2cf16abaeea081b3ca1f5d8732f7bb1.xml
  • Delete the line pc-i440fx-rhel7.2.0 near the very bottom (CTRL+K)
  • Edit the line containing pc-i440fx-rhel7.3.0 modify to pc-i440fx-rhel7.2.0

fig 2.3:

Modifying the capabilities xml file

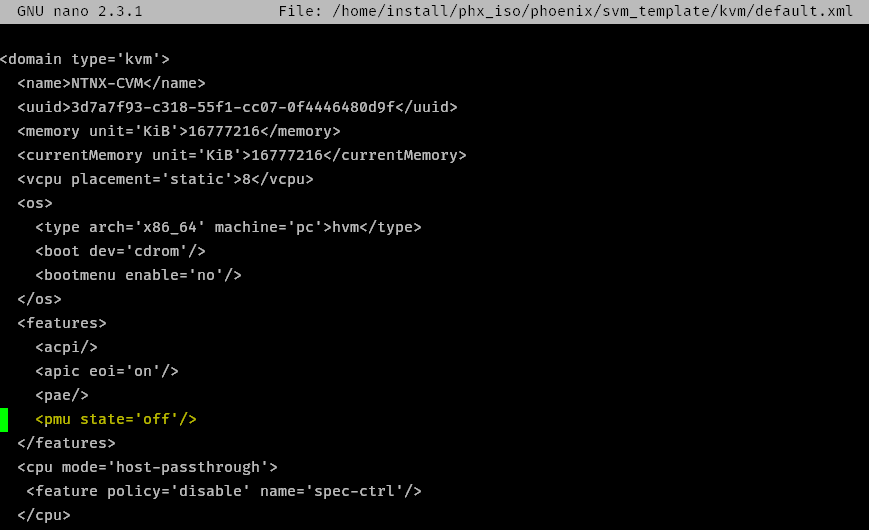
  • Modify the CVM default.xml

code:

nano /home/install/phx_iso/phoenix/svm_template/kvm/default.xml
  • Add <pmu state='off'/> to the <features> section

I believe this is disabling the “Performance Monitoring Unit” (linux-kvm.org) in libvirt

fig 2.4:

Modifying the default.xml file

Install Nutanix

  • type exit to go back to the login screen, login with install no password, then follow the instructions

All AMD Nutanix!

Troubleshooting

  • If the VM doesn’t boot and errors with dracut-initqueue timeout complaining it can’t find disk by UUID. Make sure your disks are all set to SATA on the bus
  • If the CVM won’t start after running install make sure you made the relevant VMware specific modifications.
  • If the installer won’t run complaining Intel VT-x is not running, make sure you have nested virt enabled on the vCPU - see fig 2.1. Also make sure you made the right changes to the minimum_reqs.py file.

Written with StackEdit.
Replace the MS Advanced Threat Analytics (ATA) Center Certificate

Replace the MS Advanced Threat Analytics (ATA) Center Certificate

Foreword

This guide is based on the Microsoft Document but goes into a little more detail and should be clearer, you should review the Microsoft guide as well as this one.
https://docs.microsoft.com/en-us/advanced-threat-analytics/modifying-ata-center-configuration
THIS MUST BE DONE BEFORE CERTIFICATE EXPIRES!!
I am purposely not using auto enrolment. This may generate a new thumbprint if the certificate auto renews, causing all the gateways to stop talking to the ATA Center server. This process must be done manually before the certificate expires each time!
This guide assumes you have a PKI infrastructure in your domain. The certificate you generate must be trusted by the gateway for this to work otherwise the gateways will disconnect from the ATA Center.
In this guide, I will:
  • Add a second server certificate
  • Update all the gateways so they recognise the new certificate
  • Switch to the new certificate
  • Update all the gateways again so they only use the new certificate.

Replacing the certificate

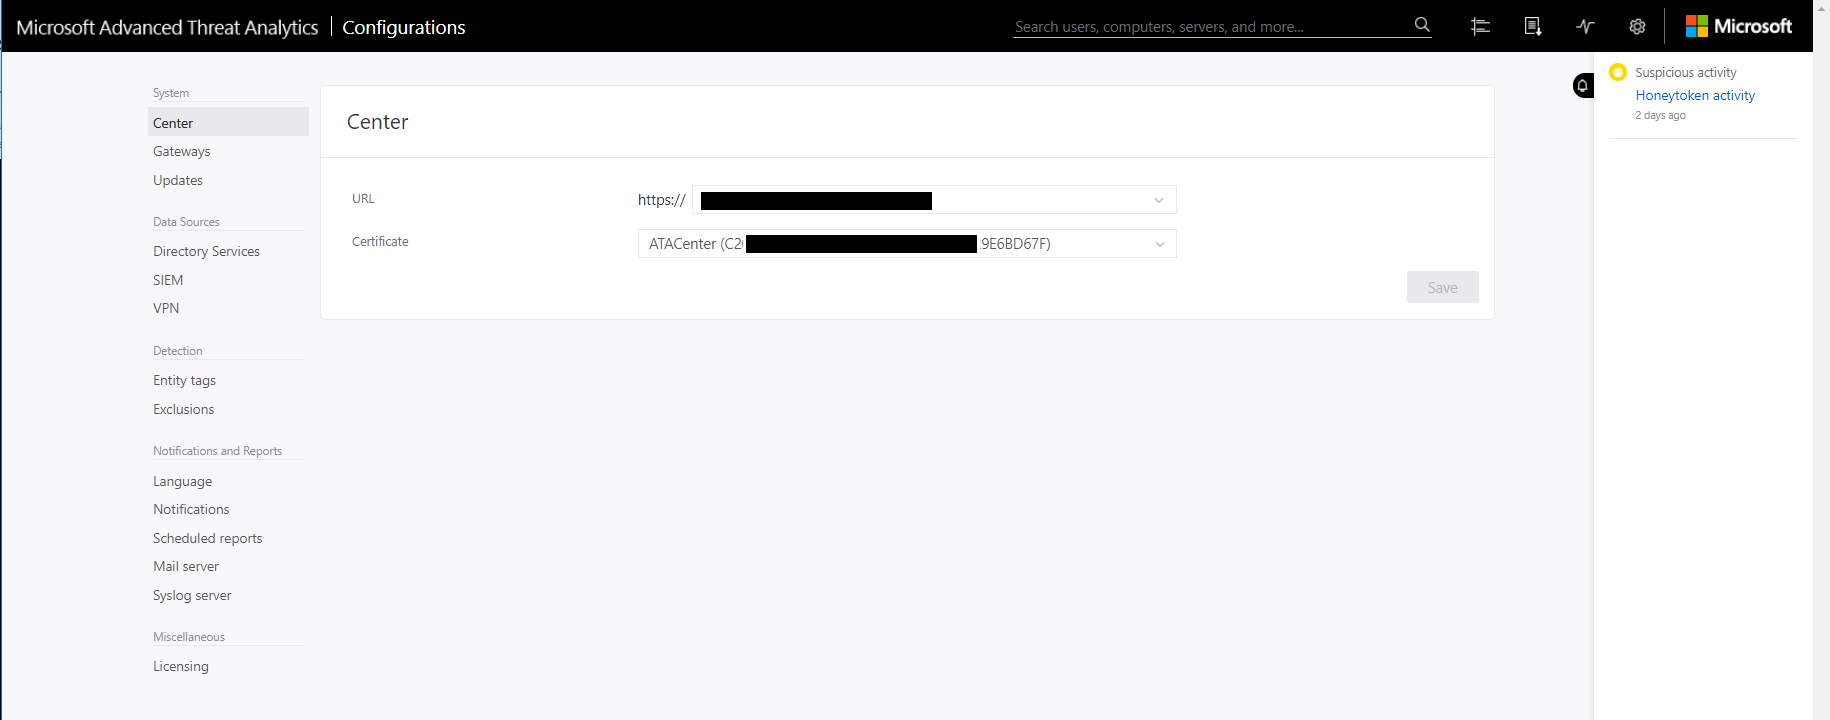
  • Check the existing certificate in the management panel. Currently all the gateways only have this certificate pinned in their configuration and will only talk to the Center if it’s using this certificate.
not secure
Center Configuration

Generating the New Certificate

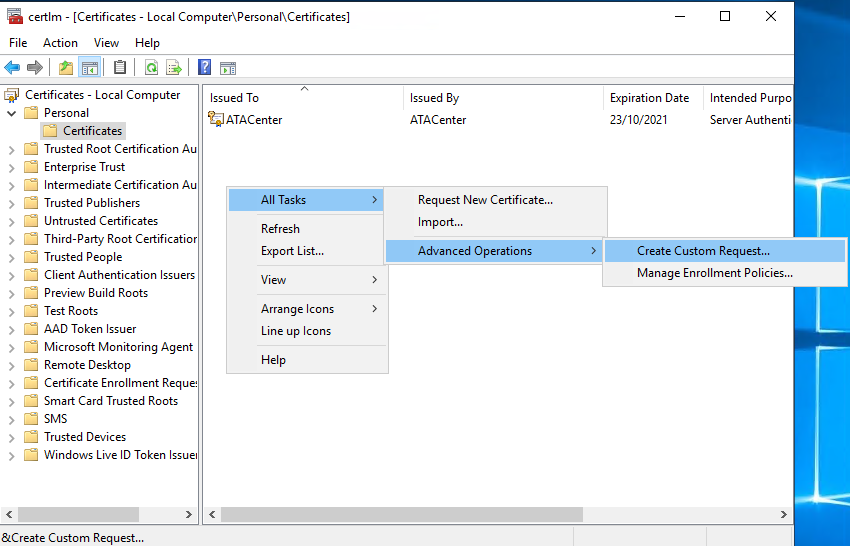
  • Log into the ATA Center Server and open “Manage Computer Certificates”
  • Open Personal > Certificates
  • Right click in the right pane
  • Select All Tasks > Advanced Options > Create Custom Request.
Create Custom Certificate
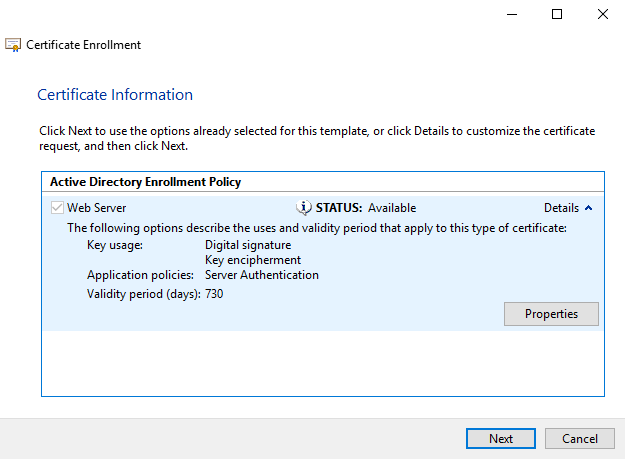
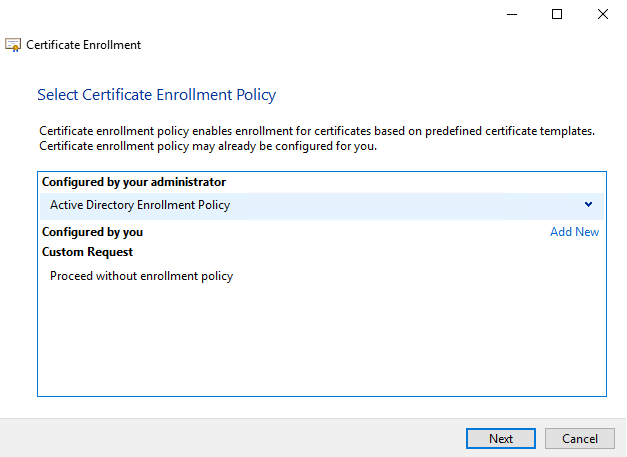
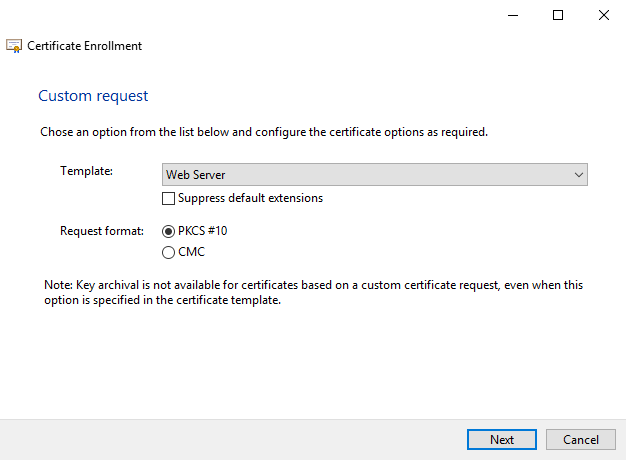
  • Follow the enrolment wizard and select web server certificate template
Certificate Enroll
Web Server Template
  • On the Certificate Information screen, expand details and click properties
Web Certificate Information
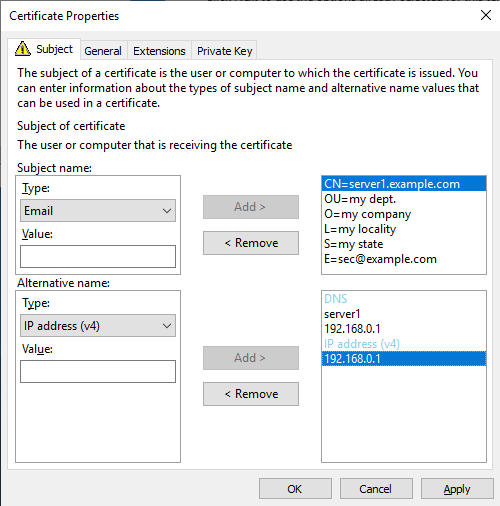
  • Fill out the form, include all the relevant details including alternative names
Filling in Certificate Information
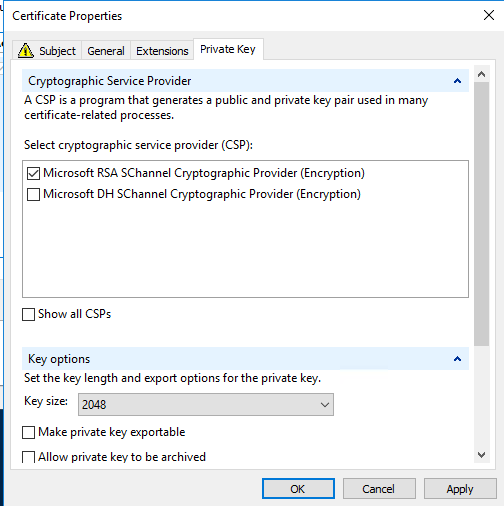
  • Deselect Microsoft DH Provider in the Private Key tab and change the Key size to 2048 bits
Filling in Certificate Information
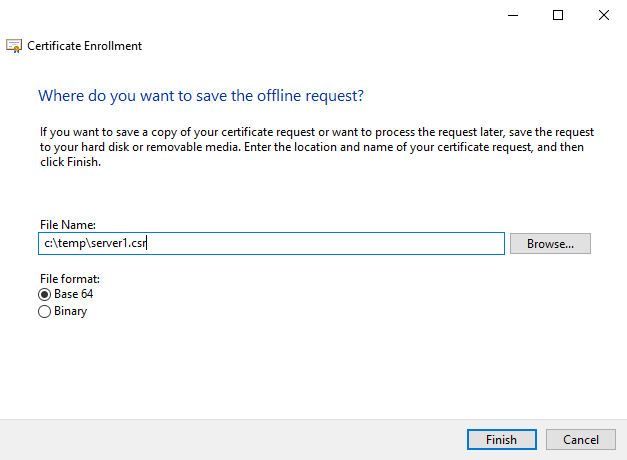
  • Save the CSR somewhere handy
Save As
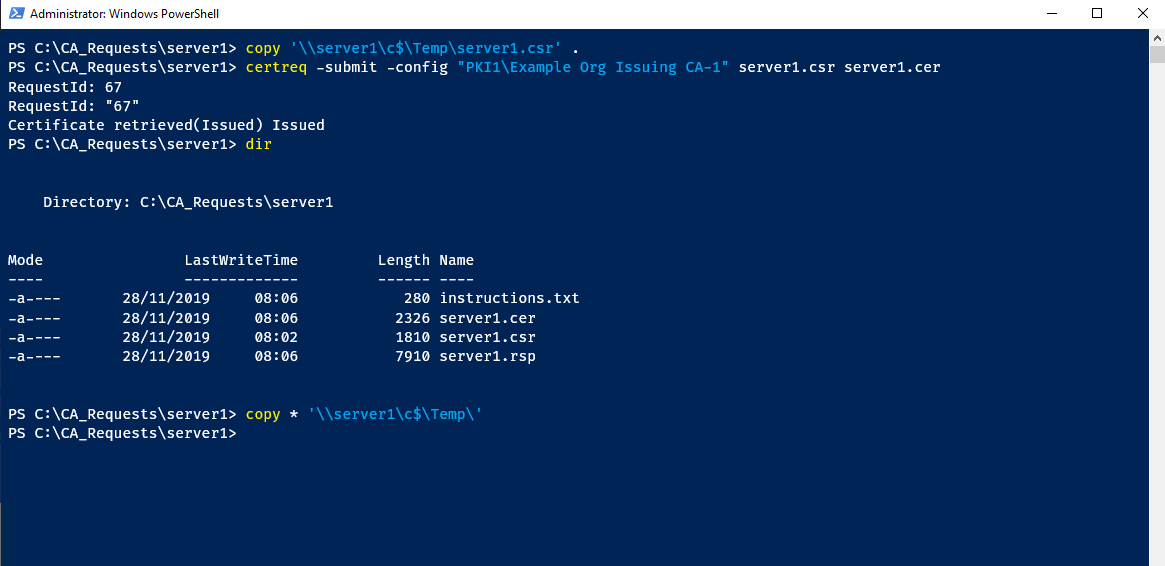
  • Copy the CSR to your issuing CA
  • Run the following certreq command to generate the certificate
    certreq -submit -config “SERVER1\ADCS Issuing CA-1” server1.csr server1.cer
  • Copy the resulting files back to the ATA Center server
Copy files in PowerShell

Importing the Certificate

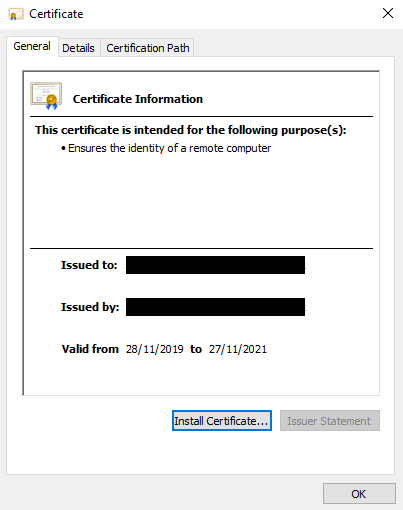
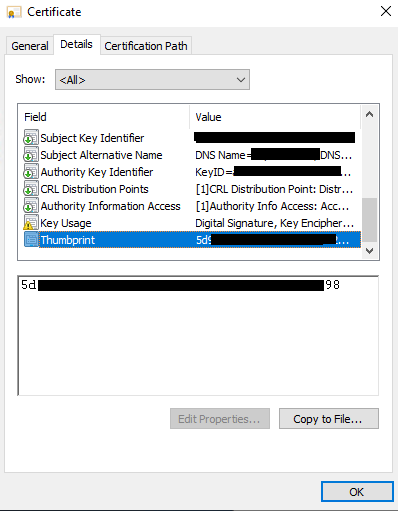
  • Open the certificate, note the thumbprint, then install the certificate into the local computer, Personal store
Freshly Minted Certificate
Freshly Minted Certificate Thumbprint
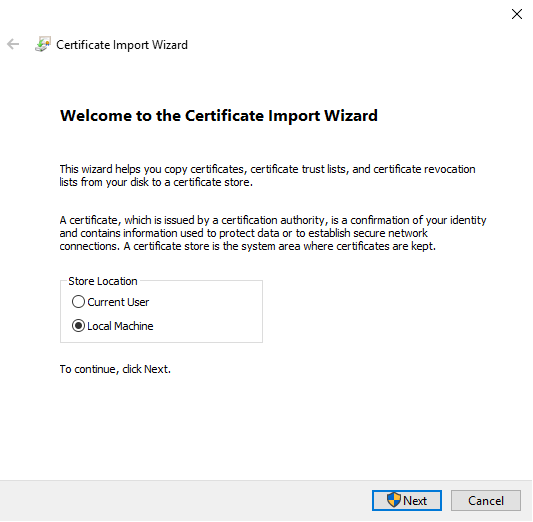
Import Wizard Local Machine
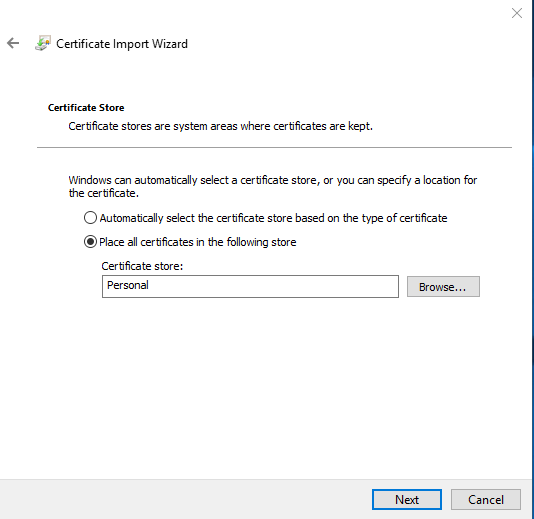
Import Wizard Personal Store

Replacing the Certificate in ATA Center

  • Log into ATA Center web console
  • Configuration > Center
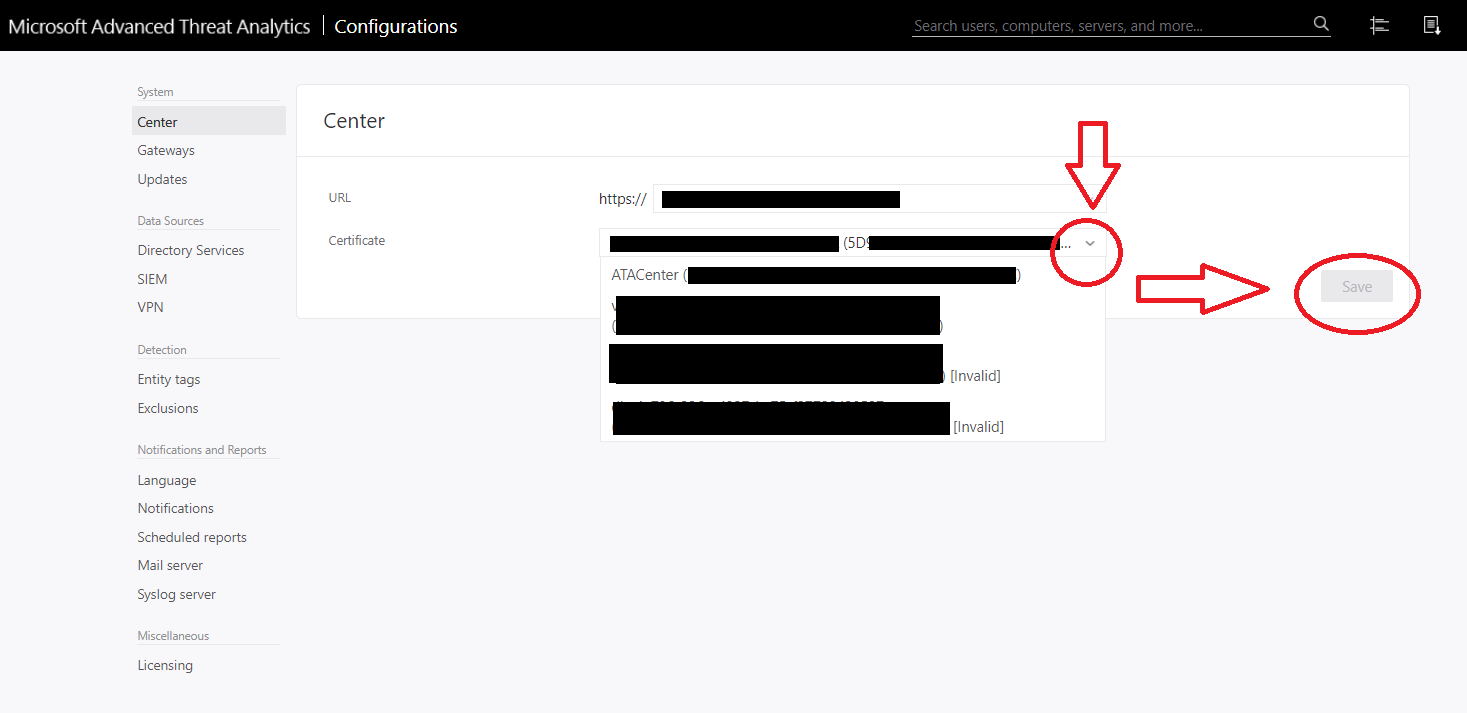
  • Select the new certificate, check the thumbprint matches the newly installed cert

IMPORTANT STEP, DON’T CLICK ACTIVATE YET

ATA Center Select Certificate
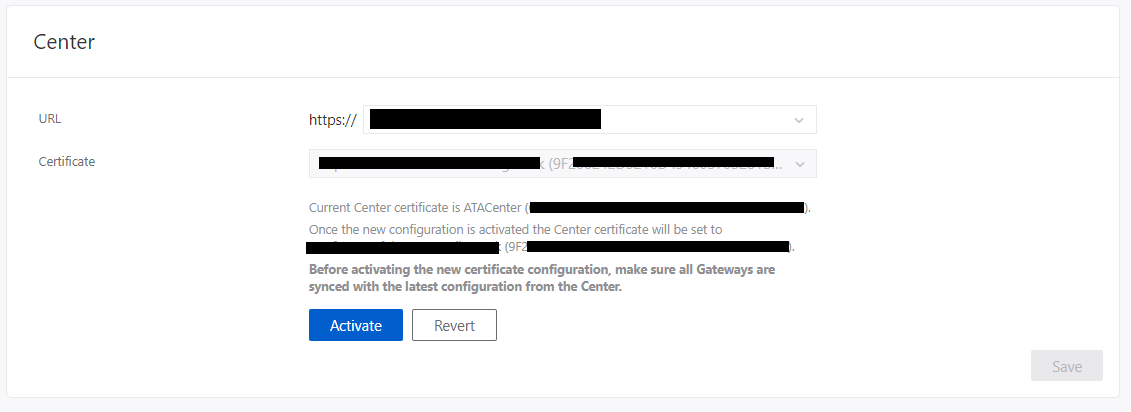
  • Click Save and wait for all gateways to sync the config – do not click activate
Gateways Syncing
Gateways Synced
  • Once you see the Green message that all gateways have synced the config click Activate and wait for all gateways to sync the config again.
Activate the Certificate
Gateways Syncing
Gateways Synced
  • You can now restart the ATA Center service in Windows
Restart ATA Center Service
When you reload the page in a fresh browser, the certificate should now be the new trusted cert.

Nutanix CE 2.0 on ESXi AOS Upgrade Hangs

AOS Upgrade on ESXi from 6.5.2 to 6.5.3.6 hangs. Issue I have tried to upgrade my Nutanix CE 2.0 based on ESXi to a newer AOS version for ...